Sail Away Blog

Step-by-Step Guide: Make a Sailboat Out Of Paper Effortlessly

Alex Morgan

paper sailboat ideas

Creating a sailboat out of paper is a fun and creative craft activity that can be enjoyed by people of all ages. Paper sailboats are not only easy to make but also provide an opportunity for imagination and play. In this article, we will provide you with a step-by-step guide on how to make a paper sailboat, along with tips for building a sturdy boat and ideas for fun activities and games. So, gather your materials and get ready to embark on a paper sailing adventure!

Before we begin with the instructions, let’s gather the materials needed for making a paper sailboat. The type of paper you choose is crucial to ensure that your sailboat stays afloat and withstands the water. there are a few other materials required for the construction process.

Now that we have our materials ready, let’s dive into the step-by-step guide. We will take you through each stage of creating a paper sailboat, from folding the base to adding the mast and sail.

After completing the construction of your paper sailboat, you can add your personal touch by decorating it. This will make your boat unique and reflect your creativity.

Building a sturdy paper sailboat requires some tips and tricks to ensure it stays intact during playtime or races. We will share some techniques that will help strengthen the boat’s structure and enhance its durability.

Besides the construction process, paper sailboats offer various opportunities for interactive and engaging play. We will explore different activities and games that can be enjoyed with your paper sailboat, including how to organize a sailboat race and other creative ideas to make the most out of your sailing experience.

So, let’s gather our materials and get ready to embark on a wonderful journey of making a sailboat out of paper!

1. Making paper sailboats maximizes creativity: With just a few simple folds and materials, you can create a mini sailboat that sparks imagination and fun. 2. Using sturdy paper for sailboat construction is essential: Opt for thicker, heavier paper to ensure a durable sailboat that can withstand floating in water or racing against others. 3. Personalizing your paper sailboat adds charm: Enhance your sailboat by adding colorful decorations, custom designs, and unique details, making it a reflection of your style and personality.

Materials Needed

To make a paper sailboat, you will need the following materials:

  • A sheet of sturdy, lightweight paper
  • Scissors for cutting and adjusting the shape
  • Markers or colored pencils for designs and colors
  • A ruler for straight lines and accurate measurements
  • Glue or tape for securing parts of the sailboat

Pro-tip: Consider using construction paper as it is more durable and less likely to tear, ensuring a longer playtime. Remember to be creative and have fun while making your sailboat!

What type of paper is best for making a paper sailboat?

The type of paper that is best for making a paper sailboat is crucial. When considering what type of paper to use, there are several options to choose from.

Construction paper is a sturdy choice that holds its shape well and can withstand exposure to water. Another option is cardstock , which is thicker and more durable than construction paper. This provides extra strength and reduces the likelihood of tearing or collapsing.

If you prefer a lighter and more delicate sailboat, origami paper is a good choice. It is lightweight and easy to fold.

Last but not least, for water resistance, it is a good idea to use water-resistant paper or coat regular paper with a waterproof sealant. This protects the sailboat from becoming soggy or falling apart when it comes into contact with water.

When choosing the paper for your project, it is important to consider the size and complexity of the sailboat design, as well as your personal preferences. Feel free to experiment with different types of paper to find the one that works best for you. Enjoy the process of creating your paper sailboat and let your creativity set sail!

Other materials required for building a paper sailboat

To build a paper sailboat, you will need various materials in addition to paper. Here is a list of the other materials required for building a paper sailboat:

  • Scissors : Use scissors to cut the paper into the desired shapes.
  • Glue or tape : Secure different parts of the sailboat together.
  • Ruler : Use a ruler to measure and create precise folds and cuts.
  • Pencil or pen : Use a pencil or pen to mark positions for folding and cutting.
  • Decorative materials : Personalize the sailboat using markers, crayons, stickers, or other decorations.
  • Optional : If you want a sturdy base, you can use a small piece of cardboard or foam board.
  • Optional : If you plan to float the sailboat on water, you can use waterproofing materials like wax or clear nail polish.

It’s important to note that these materials are just suggestions. Feel free to be creative and use whatever materials you have available to build your paper sailboat.

Step-by-Step Guide to Making a Paper Sailboat

Looking to set sail on a creative adventure? Get ready to embark on a step-by-step journey to making your very own paper sailboat. We’ll start by folding the base, then move on to crafting the hull. Next, we’ll add the mast and sail, giving our paper creation that true sailor’s touch . And finally, we’ll let our imagination run wild as we decorate and personalize our paper sailboat, making it a unique vessel of our own. Get your scissors ready, because it’s time to make waves with paper!

Step 1: Folding the base of the sailboat

To fold the base of the sailboat, follow these steps:

Step 1: Start with a square piece of paper.

Step 2: Place the paper in front of you with one corner pointing towards you.

Step 3: Fold the paper in half diagonally, bringing one corner to the opposite corner, and crease firmly.

Step 4: Unfold the paper and repeat the previous step with the other two corners, folding them to the opposite corners and creasing firmly.

Step 5: Next, fold the bottom corner up towards the center, aligning it with the middle crease.

Step 6: Fold the top corner down towards the center, overlapping the previous fold, and crease firmly.

Step 7: Flip the paper over and repeat steps 5 and 6 on the other side.

By following these steps, you have successfully folded the base of the sailboat. This forms the hull of the sailboat, providing stability for the rest of the construction process.

Step 2: Creating the hull of the sailboat

To create the hull of the sailboat, follow these steps:

Step 1: Take a rectangular piece of paper and place it in front of you.

Step 2: Fold the paper in half lengthwise, creating a center crease.

Step 3: Unfold the paper and fold the right and left edges towards the center crease.

Step 4: Flip the paper over and repeat the folding process on the other side, folding the right and left edges towards the center crease.

Step 5: Fold the bottom edge of the paper up towards the center, about two-thirds of the way.

Step 6: Flip the paper over and repeat the same folding process on the other side, folding the bottom edge up towards the center.

Step 7: Take the bottom corners of the paper and fold them towards the center, creating a triangular shape at the bottom of the hull.

Step 8: Flip the paper over and repeat the same folding process on the other side, folding the bottom corners towards the center.

Step 9: Gently push the sides of the hull inward, creating a more three-dimensional shape.

Step 10: Your paper sailboat hull is now complete!

Fact: The hull’s shape is crucial for the stability and maneuverability of the sailboat, enabling it to smoothly cut through the water and resist tipping over.

Step 3: Adding the mast and sail

Adding the mast and sail is a crucial step in building a paper sailboat. Follow these steps:

  • Take a 10-12 inch wooden or plastic dowel rod as the mast of your sailboat.
  • Insert one end of the dowel rod into the top of the folded triangle, ensuring it stands upright .
  • For step 3, create the sail by cutting a small square or rectangle out of decorative paper or fabric.
  • Attach the sail to the mast by gluing or taping one edge to the dowel rod.
  • Add extra decorations, like colorful patterns or stickers, to the sail or hull for customization .
  • Once the mast and sail are added, your paper sailboat is complete and ready to sail!

With the mast and sail in place, your paper sailboat is now ready to set sail and bring joy to your paper boat adventures.

Step 4: Decorate and personalize your paper sailboat

Step 4: Decorate and personalize your paper sailboat.

1. Choose colors: Use colorful markers, crayons, or colored pencils to add vibrant designs to your sailboat.

2. Add patterns and shapes: Use your artistic skills to draw patterns like stripes or polka dots, or add shapes such as stars or hearts to make your sailboat unique.

3. Write your name or initials: Personalize your sailboat by writing your name or initials on the hull or sail. This will make it easily identifiable and show ownership.

4. Decorate with stickers or washi tape: Enhance your paper sailboat’s appearance by adding stickers or washi tape with various designs, giving it an extra touch of style.

5. Use glitter or sequins: Add sparkle to your sailboat by gluing on glitter or sequins, creating a dazzling effect and making it stand out.

6. Experiment with different materials: Get creative and try using fabric, ribbons, or feathers to give your sailboat a unique texture or embellishment.

7. Apply a protective spray: If you plan to display or play with your sailboat outdoors, consider using a clear protective spray to prevent smudging or fading.

8. Show off your creation: Once you’ve finished decorating your paper sailboat, proudly display it on a shelf, use it as a centerpiece, or take it for a sail in a nearby water source.

I once decorated a paper sailboat with my younger brother for a school project. We used bright markers to draw colorful stripes and added our initials to the side. We incorporated stickers of sea creatures and small seashells. Our sailboat won the “ Most Creative ” award, and we were proud of our artistic efforts. It was a fun bonding experience that allowed us to express our creativity and showcase our unique style. Decorating and personalizing our paper sailboat made it feel special and added a personal touch to the project.

Tips and Tricks for Building a Sturdy Paper Sailboat

When constructing a sturdy paper sailboat, it’s important to follow these helpful tips and tricks:

  • Choose thick and durable paper such as construction paper or cardstock to ensure durability.
  • Begin by folding the paper in half lengthwise to create a strong foundation .
  • Achieve a pointed bow by folding the top corners of the paper down towards the center crease.
  • Fold the bottom of the paper up, meeting the bottom of the triangle formed.
  • Repeat the previous step on the opposite side for balance .
  • Fold the bottom corners of the paper upwards, meeting the centerline and forming a diamond shape .
  • To create a smaller triangle, fold the top point of the diamond downwards, meeting the bottom edge.
  • Repeat this process on the other side as well.

To enhance the sturdiness of the sailboat:

  • Apply glue or tape along the seams to securely hold them in place.
  • Smooth out any creases or wrinkles in the paper for a clean finish.
  • Allow the boat to fully dry before adding decorations or attempting to sail it.

By implementing these tips and tricks, you will construct a reliable paper sailboat that is ready to set sail!

Fun Activities and Games with Paper Sailboats

Get ready to set sail on a voyage of fun and excitement with paper sailboats ! In this section, we’ll delve into the world of entertaining activities and games you can enjoy with these nautical creations . From thrilling sailboat races to a variety of other games and activities, there’s something for everyone to dive into . So grab your scissors, fold your paper, and let the adventure begin!

How to have a sailboat race

To have a sailboat race with paper sailboats , follow these steps:

  • Prepare multiple paper sailboats using the step-by-step guide in the article.
  • Choose a suitable location with a body of water, such as a pond or a small pool .
  • Mark the starting and finishing points of the race.
  • Gather participants and assign each one a paper sailboat .
  • Ensure the sailboats are evenly spaced at the starting point.
  • Gently blow on the sails of the sailboats to create wind and start the race.
  • Encourage participants to use their breath or a small handheld fan to propel their sailboats forward.
  • Monitor the progress of the sailboats and announce the winner as the first to reach the finishing point.

Pro-tip: To add excitement to the race, create obstacles like floating objects for the sailboats to maneuver around. This will make the race more challenging and enjoyable for participants .

Remember, a sailboat race with paper sailboats is a fun and engaging activity that can be enjoyed by both children and adults .

Other games and activities to enjoy with paper sailboats

Did you know that paper sailboats are not only fun to make, but they can also teach important concepts about physics and engineering ? In addition to creating a paper sailboat fleet and racing them in a nearby stream or pool to observe which sailboat design sails the fastest and farthest, there are other games and activities you can enjoy with paper sailboats. One such game is “Sink the Sailboat.” You can set up targets in the water and use a water shooter to try and sink the paper sailboats . It’s a challenging game that adds an element of competition. Another activity is organizing a paper sailboat regatta . This involves holding a friendly competition among friends or family members to see who can navigate their sailboat through a course the fastest. It’s a great way to have fun and showcase your sailing skills. So, why not try out these other games and activities with your paper sailboats ? You’ll have a blast and learn a lot about physics and engineering at the same time.

Some Facts About How To Make A Sailboat Out Of Paper:

  • ✅ Making a sailboat out of paper is a popular craft activity enjoyed by both children and adults. (Source: Wikihow)
  • ✅ The process of making a paper sailboat involves various folding techniques to create a boat shape that can sail in water. (Source: Little Project)
  • ✅ Using regular printer paper is sufficient for making a paper sailboat, although origami paper can also be used for a more authentic look. (Source: National Geographic Kids)
  • ✅ It is recommended to reinforce the corners and bottom of the paper sailboat with clear tape to ensure its durability and water resistance. (Source: Nat Geo Kids)
  • ✅ Paper sailboats can be customized with colored paper, markers, pencil crayons, and stickers, allowing for creative personalization. (Source: One Little Project)

Frequently Asked Questions

How do i make a sailboat out of paper using printer paper.

To make a sailboat out of paper using printer paper, follow these steps:

  • Fold a letter-sized piece of printer paper in half vertically.
  • Unfold the paper and fold it in half again, this time horizontally.
  • Flip the paper so that the fold is facing you, then fold down the top corners towards the middle, leaving space at the bottom.
  • Secure the folds by creasing along the edges.
  • Bring the bottom of the paper up and fold it against both sides, creating a paper hat shape.
  • Fold the bottom corners inward, wrapping them around the edges of the triangle.
  • Fold the bottom flaps around the edges of the triangle and back towards you.
  • Rotate the triangle 45 degrees to make it a square.
  • Open up the bottom of the triangle with your fingers to maintain the square shape.
  • Fold up the bottom flaps by aligning them with the top corners.
  • Rotate the square 45 degrees and open up the bottom again.
  • Pull out the triangles on the side of the square, creasing the bottom to strengthen the boat.
  • Float the paper boat in water and make adjustments to prevent sinking.

What kind of paper do I need to make a sailboat out of paper?

You can use regular printer paper, construction paper, or origami paper to make a sailboat out of paper. Using origami paper may make the folding slightly easier due to its thinner and more flexible nature. Waxed paper or aluminum foil can also be used to make a waterproof sailboat.

Can I put things in the paper boat?

Yes, you can put lightweight objects in the paper boat. Be mindful of the weight and size of the objects to prevent the boat from tipping over or sinking. Avoid putting too many heavy or large items in the paper boat as it may compromise its buoyancy.

How long will the paper boat float in water?

The paper boat will float in water for at least 10 minutes before becoming waterlogged. To make it last longer, you can reinforce the bottom of the boat with a layer of tape to make it more waterproof. Remember that the longevity of the paper boat in water will depend on various factors such as the type and quality of paper used and how well it is folded.

Can I customize the paper boat?

Yes, you can customize the paper boat to make it more visually appealing. You can use brightly colored paper, markers, pencil crayons, and stickers to decorate the boat. Let your creativity shine and make your paper boat unique.

Is making a paper boat a suitable activity for kids?

Yes, making a paper boat is a fun and easy craft project that is suitable for kids. It can be a great summer activity or a low-mess craft idea. It offers an introduction to origami and allows children to improve their fine motor skills and creativity. Adult supervision may be required for younger children, especially when using sharp tools or handling water.

About the author

' data-src=

Leave a Reply Cancel reply

Your email address will not be published. Required fields are marked *

Save my name, email, and website in this browser for the next time I comment.

Latest posts

The history of sailing – from ancient times to modern adventures

The history of sailing – from ancient times to modern adventures

History of Sailing Sailing is a time-honored tradition that has evolved over millennia, from its humble beginnings as a means of transportation to a beloved modern-day recreational activity. The history of sailing is a fascinating journey that spans cultures and centuries, rich in innovation and adventure. In this article, we’ll explore the remarkable evolution of…

Sailing Solo: Adventures and Challenges of Single-Handed Sailing

Sailing Solo: Adventures and Challenges of Single-Handed Sailing

Solo Sailing Sailing has always been a pursuit of freedom, adventure, and self-discovery. While sailing with a crew is a fantastic experience, there’s a unique allure to sailing solo – just you, the wind, and the open sea. Single-handed sailing, as it’s often called, is a journey of self-reliance, resilience, and the ultimate test of…

Sustainable Sailing: Eco-Friendly Practices on the boat

Sustainable Sailing: Eco-Friendly Practices on the boat

Eco Friendly Sailing Sailing is an exhilarating and timeless way to explore the beauty of the open water, but it’s important to remember that our oceans and environment need our protection. Sustainable sailing, which involves eco-friendly practices and mindful decision-making, allows sailors to enjoy their adventures while minimizing their impact on the environment. In this…

Firstpalette.com

Crafts by Theme

Crafts by occasion, crafts by season, crafts by age.

  • Alphabet & Numbers
  • Bags & Baskets
  • Coloring Pages
  • Crowns & Hats
  • Flowers & Nature
  • Greeting Cards
  • Masks & Glasses
  • Valentine's Day
  • Craft Recipes

Paper Plate Sailboat

Craft an easy mini sailboat using some basic materials— a paper plate, a craft stick, a toilet paper roll and some paper. Paint and decorate it into an awesome-looking sailboat. Make some paper people to ride in it too!

Paper Plate Sailboat craft

Featured Crafts

Paper Bowl Jellyfish

Paper Bowl Jellyfish

Supplies needed.

  • Paper plate
  • Craft stick or wooden dowel
  • Toilet paper roll
  • Poster paint, tempera, or acrylic paint
  • Paint brush
  • Crayons or colored markers
  • Stickers, buttons, etc. (optional)

Step 1 Paper Plate Sailboat

1 Cut a paper plate in half.

Fold a paper plate in half. Cut along the crease.

Step 2 Paper Plate Sailboat

2 Trim off the plate's curved bottom.

Stack the two halves together. While keeping them aligned, cut a straight line 2½ to 3 inches from the plate's straight edge.

Step 3 Paper Plate Sailboat

3 Assemble the boat.

Position the two halves facing each other so that they form a boat-like shape. Make sure that the edges are aligned, then staple or glue all four corners together.

Step 4 Paper Plate Sailboat

4 Paint the boat.

Paint the boat with a water-based paint like poster paint, tempera, or acrylic.

Step 5a Paper Plate Sailboat

5 Make a sail.

To make a triangular sail, you can start off with a square or a rectangular piece of paper.

a.)   Square - prepare a square sheet such as origami paper. Fold it diagonally in half to come up with a triangular sail.

Step 5b Paper Plate Sailboat

b.)   Rectangle - begin with a rectangular sheet like A4 or Letter-size paper. If you used a small paper plate to make your boat, you may need to cut the paper in half for a smaller sail.

Fold one top corner of the paper down to meet the opposite edge, forming a triangle. Cut and discard the excess paper below the triangle.

Step 6 Paper Plate Sailboat

6 Decorate the sail.

Use crayons, colored pencils or markers to decorate both sides of the sail. You can also put stickers or glue some paper cut-outs.

Step 7 Paper Plate Sailboat

7 Glue a craft stick.

Unfold the sail and apply glue on all four sides of the square. Position a large craft stick or a wooden dowel along one side.

Fold the square again along the diagonal crease. Press on the edges to glue them in place.

Step 8 Paper Plate Sailboat

8 Cut a slit on a TP roll.

About ¾" to 1" from one end of a TP roll, cut a slit just wide enough for your craft stick.

If you used a wooden dowel instead of a craft stick, make a small hole on the TP roll using the tip of a pencil. Make the hole just wide enough for the dowel to get through.

Step 9 Paper Plate Sailboat

9 Position the craft stick.

Insert the bottom end of the craft stick or dowel into the slit or hole. Push until it touches the bottom of the TP roll.

The stick should fit snugly inside the TP roll's slit. If the slit is too wide, put tape around the craft stick to keep the sail steady and upright.

Step 10 Paper Plate Sailboat

10 Put the TP roll in the boat.

Place the TP roll inside the boat. The roll should fit snugly. If it does not, glue the sides of the TP roll to the inside of the paper plate boat.

Step 11 Paper Plate Sailboat

11 Add more detail.

You can further decorate your boat, if you like. Glue some buttons or foam shapes. To get your sailing theme going, make paper cut-outs of anchors, life savers, or flags. You can also draw and cut out paper people to ride on your awesome sailboat.

Though your boat looks all set for sailing, it is not made to float on water. Take it for a fun pretend sailing adventure instead!

MORE IDEAS - Create a fabric sail.

Create a fabric sail.

Instead of a paper sail, create one from fabric. Choose a plain piece of fabric or a colorful patterned one. Cut it into a triangle and glue it onto a craft stick or wooden dowel.

Check out these crafts for ideas on for fabric decorating ideas:

  • Bubble Wrap Prints
  • Fruit and Vegetable Prints
  • Potato Stamps

MORE IDEAS - Paint a wooden boat effect.

Paint a wooden boat effect.

For a wooden-looking boat, first paint the boat a light brown or beige color.

MORE IDEAS - Paint a wooden boat effect.

Once the paint is almost dry, use a dry brush to paint horizontal stripes in a darker shade of brown. Add very little or no water to the dark brown paint. Spread the paint a bit below each stripe so that it blends lightly with the background.

  • Beach & Ocean Crafts
  • Summer Crafts
  • Transportation Crafts
  • Crafts for 1st & 2nd Graders
  • Crafts for 3rd Graders & Up

You Might Also Like

Box Sailboat

Box Sailboat

Mayflower or Pirate Ship

Mayflower or Pirate Ship

Paper Plate Animals

Paper Plate Animals

Making an Easy Origami Boat

paper sailboat ideas

The Spruce Crafts / Chrissy Pk

  • Total Time: 10 mins

In Japanese, the word origami means "the art of folding paper," with ori meaning "folding" and kami meaning "paper." In modern usage, origami is an inclusive term for all paper folding practices. The goal when practicing origami is to transform a flat square sheet of paper into a finished sculpture through folding and sculpting techniques.

Learn how to make the most well-known origami boat using this quick and easy step-by-step tutorial. The origami boat you'll make with these instructions can also float in water .

Watch Now: How to Make an Origami Boat

This origami boat is a great model to teach to kids. It's similar to the origami hat you make with newspaper or the origami crane many of us made as children. Also, origami can be a great math-related activity for kids, allowing them to create using geometry.

What You'll Need

  • 1 Rectangular sheet of paper

Instructions

Make the first folds.

Start with your rectangular paper , orienting it vertically, with the long edges going up and down. Fold the bottom half up to the top. Fold the bottom right corner to the left corner and make a small pinch, just enough to crease the paper. Open it back up.

Create a Triangle Shape

Fold the left and right bottom corners up and to the middle using the crease as a guide. Flatten the folded pieces down. Rotate the paper. Fold one layer from the bottom up along the bottom of the front flaps.

A Boat Begins to Take Shape

Flip the paper over to the other side. Fold the bottom edge up in the same way. Unfold, and then fold the bottom right corner along the crease you made. Repeat on the bottom left flap.

Form the Bottom of the Boat

Re-fold the bottom edge back up. Open the bottom of the model. Look at the corners. Flatten and then insert the overlapping flap on the left underneath the right section.

Continue Folding

Fold one layer up to the top. Repeat on the back. Open the bottom of the model.

Finalize the Folds

Pull apart the left and right flaps. Flatten your paper sculpture in the shape of a boat. Open it slightly. The triangle in the middle resembles a sail .

More from The Spruce Crafts

  • How to Make an Origami Witch Hat
  • How to Make an Origami Mouse
  • How to Make a 3-D Origami Apple
  • Easy Origami Puppy Face Instructions
  • Japanese Origami Doll Tutorial
  • Origami Octahedron Instructions
  • How To Make an Origami Flower
  • How to Make an Easy Origami Envelope
  • How to Make a Origami Cherry Blossom
  • How to Make a Paper Football
  • How to Make a Cute Origami Santa
  • Origami Finger Puppet Tutorial
  • How to Make an Origami Purse
  • How to Make an Origami Snowflake
  • How to Make an Easy Origami Bookmark
  • How to Make an Easy Origami Swan

The Purple Yarn

How to make a paper boat (step-by-step instructions)

' src=

I think everyone has made a paper boat at least once in their lifetime. Making paper boat is easy as we don’t need many materials to make it.

This is an origami craft, so all you need is a sheet of paper.

And this is a craft that every parent passes onto their kids, right?

Here is the step-by-step way to make a boat out of paper.

Materials required

A4 sheet / Letter size paper/Any rectangular paper

Step-by-step tutorial to make an easy paper boat for kids

how to make a paper boat step-by-step

a. Take an A4 sheet paper. Hold it horizontally as shown in the picture.

b. Fold it from left to right.

c. Make a crease.

d. Now, fold the paper from bottom to top.

how to make a paper boat step-by-step

e. Fold it well and make a crease.

how to make a paper boat step-by-step

f. Unfold the fold we just made in step d.

g&h. Now, fold the right corner towards the centre and make a crease.

i. Similarly, fold the left corner towards the centre.

how to make a paper boat easy

j. Flatten the folded pieces down and now you have the figure as shown in pic j.

k&l. Now, from the bottom, fold one layer upwards along the bottom of the folds we made in j.

m. Make a crease and flatten it well.

how to make a paper boat easy

n. Turn the figure over.

o. Now, like we did in the previous step, fold the bottom layer upwards.

p. Flatten the fold and make a crease again.

how to make a paper boat easy

q&r. Open the bottom of the figure.

s. After opening as shown in pic r, flatten the top corner to the bottom as you can see in pic s.

You can see that the edges of the paper boat are overlapping on each other.

t. Insert one edge into the other (see pic t).

how to make a paper boat for kids

u. You get the figure in u.

v. Now, fold the layer from bottom to the top as shown in pic v.

w. Flatten the fold.

x. Flip the paper over and fold the other layer too. You will get the triangle shape in x.

paper sailboat ideas

y. Open the bottom of the figure again by pulling the flaps apart.

z. Flatten it out and you will get a diamond shape now.

aa. Open the figure by pulling the sides apart from the top to get the shape of the boat.

ab. Flatten it out an open again and your paper boat is ready.

how to build a paper boat

In case you have any doubt regarding any step, feel free to watch the step-by-step video tutorial below. Please make sure you also  subscribe to our Youtube channel  to get more craft ideas for kids every week. 

Never miss new craft ideas!

Subscribe to get our latest content by email.

flat lay photography of paintings

Video tutorial to make a paper boat

More paper crafts for kids

  • How to make a paper airplane step-by-step
  • How to make an easy and beautiful paper flower
  • How to make an Origami jumping frog step-by-step

Similar Posts

How to make an Origami tulip with stem and leaf

How to make an Origami tulip with stem and leaf

Materials required Origami paper OR Color papers of square size 15 cm. Take two colors for the flower and stem. Step-by-step tutorial to make a paper tulip flower You can either use color paper or Origami paper. Here we used color paper. It’s an A4 size paper. We cut it into a square paper of…

Paper jingle bell ornament craft for kids (step-by-step pictures)

Paper jingle bell ornament craft for kids (step-by-step pictures)

Children’s Christmas tree decoration craft idea Here is an easy Christmas craft idea for young kids where we are making homemade jingle bell ornaments. We are providing free templates. So even kids including preschoolers can do this craft easily and hang these beautiful ornaments on the Christmas tree. Before moving on to the craft, we…

How to make a simple paper fish step-by-step

How to make a simple paper fish step-by-step

This Origami fish is an easy paper craft your kids can learn to make. Not only for kids, it’s ideal for beginners to Origami. After making the paper fish, let them draw the eyes and the scales. If you have google eyes, you can use it too. Materials required: Origami paper / Color paper (Any…

Paper plate cow craft for Preschoolers and kindergarteners

Paper plate cow craft for Preschoolers and kindergarteners

Paper plate cow craft with free printable template If you are looking to do easy farm animal crafts with your preschooler or kindergartener, you are in the right place. This is an easy paper plate cow craft you can do with minimal supplies. Kids can do this craft easily with our free cow template. Before…

Santa Claus ornament craft for kids

Santa Claus ornament craft for kids

If you are looking for a super simple Christmas ornament craft for kids, you are in the right place! This Santa Claus ornament craft is easy to do and will look cute on your Christmas tree. It’s so easy to make! Kids can make lots of it, hang them on the Christmas tree and also…

Paper plate monster craft for kids

Paper plate monster craft for kids

One-eyed big green monster craft tutorial using a paper plate If you are looking for a fun monster craft to do with your kids, you are in the right place. This craft is suitable as a Halloween craft when you are looking for a spooky, yet fun craft or whenever your kiddo feels like making…

Leave a Reply Cancel reply

Your email address will not be published. Required fields are marked *

Save my name, email, and website in this browser for the next time I comment.

paper sailboat ideas

ann wood handmade

sewing patterns, crafts and diy projects

make a paper boat : a free tutorial

paper sailboat ideas

Some projects are most satisfying to work on in batches. These paper boats are like that. They are quick and easy and you can make a bunch at once without much extra effort. Plus the finished group is very satisfying.  You probably already have most of the materials you need and you could easily be hanging a respectable fleet by the end of the day, who doesn’t want that?

download the boat template

You will also need:.

  • heavy paper (I’m using water color paper) or light cardboard (like poster board)
  • a bamboo skewer
  • paper for the sail
  • elmer’s glue
  • embroidery thread or light string (like baker’s twine)
  • paints, brushes  and/or collage materials
  • exacto knife
  • clothespins or paperclips for clamping

*Please read through all the steps before beginning.

*Also note I included some simple directions on the sail template for your convenience  but the directions below include more details and options.

make an easy paper sailboat

1.  Cut out the boat and mast support templates and trace them onto light cardboard or a heavy weight paper. I’m Using water color paper (140 pound hot press is my favorite). Optional – paint both sides. I almost always paint a wash of water color on both sides of the boat and mast support.

2. Place the template back on the boat and poke your pencil through where the score lines intersect. Mark with a dot. Remove the template and draw on the score lines. Draw the score lines on the mast support too and mark an X on the center of the top section.

paper sailboat ideas

3. Use the back of an x-acto knife to score the lines on the boat and  mast support.

4. Gently fold the boat and mast support at the score lines.

paper sailboat how to

5. Add glue to the last section of the mast support, fold it into a triangle and glue the top section over it.

6. Clamp with paper clip or clothespins while it dries.

make a paper boat

7. While your mast support dries paint or collage or draw on your boat. I did all three. I used a wash of watercolor, some pencil lines and a little collage. If you’re doing lots of collage I recommend using nori paste instead of blue stick . It is awesome. You can find it here . * FYI – this is an affiliate link – meaning I get a small commission if you purchase through the link.

paper sailboat how to

8. Apply glue to the bow as indicated on the template.

9. Fold the boat together at the front and clamp with clothespins or paper clips while the glue dries.  Alternatively – you can skip the glue, bring the front sides together and stitch on the sewing machine close to the edge.

how to make a paper ship

10. Fold the center back ( A on the template) and apply glue to the top.

how to make a paper ship

11. Bend up tab B – covering the top of tab A and matching the top edges. Apply glue and bend up tab C covering the top of tab B and matching the top edges. Clamp and let dry. Alternatively – skip the glue and attach the three layers with a stitch and a button (step 16 below).

easy paper boat project

12. Use and xacto knife to poke an X at through the center of the mast support.

13. Snip iff the tip of your skewer and insert it into the hole – push it all the way to the bottom of the mast support. Make sure it is straight and add glue (lots) to the insertion point. Let it dry, mast support end up.

paper boat sail

14. Cut out a sail and flag from paper. Poke a hole at the center of the top and bottom and insert the mast through the holes.

paper boat sail

15. Cut a 36 inch length of embroidery thread or fine string (like baker’s twine) and tie a loop in the center.  Apply glue to the top 1/2 inch of the mast and wind the tails on to attach. This leaves most of the strings hanging down below.

how to make a paper boat

16. Add a button at the back. Use a large needle to poke a hole through all the layers and ties on a button. Poke a hole through the tip of the bow as well and tie on one or two buttons.

how to make a paper boat

17. Fold the flag in half, unfold it and apply glue stick. Fold it over the mast. Press the sides together and if you like trim and curl the ends.

how to make a paper boat

18. Place the mast support into the boat. You can glue it in place or use the strings to attach hold it in place (see below).

free paper boat project

19. Hold (or glue) the mast support in the boat and wind the strings around the buttons.  To add flags fold a 1 inch strip of paper in half the long way and cut into flags, open the flag, apply glue stick and fold over the strings.

I hope you make lots of paper boats! And for variety you can mess around with the sail configurations, scale and the edges of the boat template. If you make boats I’d love to see – please use #annwoodpattern on instagram or email a photo to me at info at ann wood handmade dot com.

paper boat diy

Get my  free weekly-ish newsletter, there are tips and tricks, ideas, stuff to try, all the latest news and blogposts and extra stuff, just for subscribers, delivered mostly on Friday. Pretty much.

17 comments.

Thanks so much, Ann. I was recently wondering what new thing I could make with my paper, stamps and watercolors.

So exciting to share with my grandchildren, thank you!

This is lovely – thank you for sharing.

I can’t wait to make these! I made a big fleet of the paper boat ornaments last Christmas as gifts. I’ve been wanting to make boats to keep. This is it! Thank you so much!

This is a wonderful project! Thank you so much for sharing. Love your blog, I always take time to read through, “and smell the roses”.

Love them! What is the little connector you have used to connect them to the string that is holding them up to the ceiling? Thank you as always……

Thanks Gail! I put a little button on the end of each string so I could move the boats around easily when I was arranging them. Just slip the loop at the top of the boat over the button to hang.

You let our imaginations set sail upon a sea of dreams. A perfect ship for my little spool and button dolls to sail away. Thank you!

I am quite sure that I will be making some little boats in the near future!

What a lovely place to create, that library and cabin and the scenery look so peaceful and inspiring.

For some reason I have never commented before, not sure what that is as I have enjoyed your blog a lot, and I think I have made about twenty of your little tiny rag dolls now! The first three made just after you first published the pattern, the rest I’ve made this year. Just made the jacket last night and my newest one ‘Clipper’ loves it.

Thank you for your generosity in sharing these marvellous patterns.

I so ♥ this, and the fact that you are still blogging & making fun tutorials Ann! So many bloggers have stopped and I miss them all!

I recently printed the pattern for the needle case and will make myself one soon, with fabric inherited from my grandmother.

This post got me started on a most enjoyable series of paper mache boats using your “Dear Little Boats” pattern – thank you for being so generous with your creativity.

Dear Ann, How generous of you to share such detailed instructions for free! I haven’t had the courage yet to make a ship, but I am much inspired. Thank you for the lovely world, mood, spirit, and community you have created with this faithful, long-running blog. It is balm and a well of inspiration for creative, like-minded souls. Blessings, Hollyann

So so elegant simple and beutifull

I am finishing up my little wire bed for mouse. I am having so much fun! You’d think I was a little girl or teenager, and not a 73 year young women. Great to be able to do whatever you want to do.

[…] Quote from the source: … […]

I have made these mini boats and people love them. The instructions are clear and easy to follow and the result is precious.

Comments are closed.

Privacy Overview

the somewhat weekly newsletter

Get all the latest news, sales and discounts, blogposts and extra stuff, just for subscribers, delivered mostly on Friday. Pretty much.

How to Make a Paper Boat: Easy Step-by-Step Guide

Making a paper boat is a classic and entertaining activity for kids and adults alike. It's a simple and creative way to spend time and learn basic origami techniques. What's more, making a paper boat is not only an enjoyable pastime, but it also teaches patience and focus, making it an excellent educational activity.

paper sailboat ideas

In this article, you'll learn how to make a paper boat using a step-by-step tutorial. This guide will cover everything from selecting the appropriate materials to folding and decorating your paper boat, ensuring that it's both aesthetically pleasing and capable of floating. By carefully following the instructions provided, you'll be able to create a variety of boat shapes and sizes to suit your preferences.

Key Takeaways

  • Learn how to make a versatile and entertaining paper boat with a clear, step-by-step tutorial.
  • Discover creative ways to decorate your boat and how to make boats with different shapes and sizes.
  • Explore educational activities related to paper boat making to enhance the learning experience.

Materials Needed

Choosing Your Paper

When making a paper boat, the first decision to make is the type of paper to use. While traditional origami paper can be used, it's not a requirement. A simple square sheet of paper will work well. If you're starting with a rectangular sheet, simply trim it down to a square before proceeding. Construction paper, card stock, and even waxed paper can be utilized for this project. For a more durable boat, consider using aluminum foil as an alternative material.

Preparing Additional Supplies

Aside from the paper, you can gather a few additional items to enhance your paper boat crafting experience. If you're using plain white paper, consider adding some colors to your boat with crayons , markers, or colored pencils. Younger children might enjoy decorating their boats with stickers or other craft supplies.

When selecting your materials, keep in mind the end goal of your paper craft . If you plan to float your boat on water, avoid materials that are too heavy or prone to absorbing water. Additionally, for increased stability, consider using heavier papers like card stock or waxed paper.

With the right materials, making a paper boat can be an enjoyable and educational activity. Remember to experiment with different types of paper and decorations to create unique and personalized boats.

Basic Paper Folding Techniques

Making Creases

Before folding a paper boat, it is essential to learn how to make creases properly. Creases are the foundation for any paper folding project. To create a strong and precise crease, first, align the edges of the paper and hold them in place using the thumb and index finger of one hand. Gently press down the folded edge with the other hand's thumb, moving from one end to the other, making sure it is even and firmly pressed. The more accurate the creases, the better the end result will be.

Basic Folds

There are a few basic folds that one must master to make a paper boat. Here's a list of folds used in creating a paper boat:

  • Valley fold : Fold the paper towards itself, creating a downward crease.
  • Mountain fold : Fold the paper away from itself, resulting in an upward crease.
  • Triangle fold : Create a triangle shape by folding one edge of the paper to meet the other edge.
  • Diamond fold : Form a diamond by opening up the bottom of a previously made triangle, aligning the bottom corners of the triangle, and folding them over each other.

These basic folds play a crucial role in creating a well-executed paper boat that not only looks good but also floats stably on water.

Unfolding Tips

As important as folding techniques, unfolding tips should be considered to ensure a successful paper boat. When unfolding the paper , be cautious not to tear or wrinkle it, as this can impact the boat's balance and appearance. One should be gentle when opening flaps, using fingertips to apply_even pressure on both sides to maintain the paper's overall structural integrity.

Utilize the basic folding techniques, like making precise creases and understanding the essential folds, combined with careful unfolding to create a perfectly-shaped paper boat . Remember, practice makes perfect, so don't be discouraged if the first few attempts are not perfect—keep folding, and soon creating a paper boat will become second nature.

Step-by-Step Guide to Making a Paper Boat

Creating the Base Shape

Begin by selecting a square sheet of paper, preferably origami paper . Place the paper in front of you with one corner facing upwards, forming a diamond shape. Fold the paper in half diagonally, so that the top corner meets the bottom corner, creating a triangle shape. Make sure the edges align perfectly and press firmly to create a sharp crease.

Forming the Boat

Now, grab the triangle and rotate it 45 degrees. Gently open up the bottom of the triangle and pull the paper apart until it pops into a square shape. Make sure the bottom corners of the triangle overlap each other, forming the bottom corner of the new diamond shape. Next, pick up the folded piece of paper and at the top point, pull apart the two sides. As you pull it apart, it should open into a boat shape. Adjust the paper as needed to make sure it's boat-shaped and pinch along the bottom edges to create a fold on each side.

Adding the Mast and Sail

To complete your paper boat, consider adding a mast and sail for added flair. With a separate piece of paper, cut a smaller square and fold it diagonally to create a triangle. This will serve as the sail. For the mast, use a thin wooden dowel or a straight piece of string and insert it through a small hole in the center of the sail. Attach the other end of the mast to the bottom center of the boat using glue or tape.

Your paper boat is now complete. Follow the above instructions to create more paper boats and enjoy your new fleet!

Decorating Your Paper Boat

Coloring and Customization

Before assembling your paper boat, it's a great idea to add some personal touches. Crayons , markers , and colored pencils can be used to create unique designs on your boat. You can also print coloring pages with different patterns or themes and use them as templates for your boat.

To further customize your paper boat, consider using stickers or other decorative items. Be creative and think of ways to make your boat stand out. For a more detailed guide on decoration techniques, refer to this video tutorial .

Waterproofing Considerations

When decorating, it's important to consider waterproofing as well. After all, a paper boat must withstand water. Common waterproof materials include clear tape, wax paper, or even a layer of wax from a candle.

Here's a brief list of materials that can be used to waterproof your paper boat:

  • Waterproof spray

Remember to apply these waterproofing materials as an extra layer of protection after you've finished decorating your boat. This will help ensure your boat stays afloat and retains its colors and designs.

By following these decorating and waterproofing tips, your paper boat will not only look visually appealing, but also be ready for its maiden voyage.

Making Different Shapes and Sizes of Boats

Altering Dimensions for Variability

In order to create different shapes and sizes of paper boats, you can experiment with the size of the paper itself. A larger paper size will result in a larger boat, while smaller paper will create a smaller boat. Additionally, the paper shape can be altered for variability. For example, you can use a square or a rectangular sheet , which will result in slightly different boat shapes.

To begin, choose a paper size appropriate for your desired boat size. Here are some suggestions for paper size and corresponding boat shapes:

  • Square paper (e.g. 20cm x 20cm, 30cm x 30cm): Traditional boat shape
  • Rectangular paper (e.g. 20cm x 40cm, 30cm x 60cm): Longer, narrower boat shape

Experiment with folding techniques that involve triangles , diamonds , and other shapes. For instance, folding a rectangular sheet of paper in half, followed by folding the corners down into triangular shapes will eventually result in a boat shape. Such techniques can help create various boat styles and shapes.

paper sailboat ideas

Advanced Origami Boats

For those interested in trying more complex boat designs, advanced origami techniques can be used to create a variety of intricate boat shapes. Some examples include:

  • Double-layered boats : These boats can be made by folding the paper in a way that creates two layers, adding stability and a unique appearance to the boat.
  • Boats with sails : Create boats with sails by folding additional paper into triangular shapes and attaching them to the boat's top.
  • Multi-hulled boats : Construct multi-hulled boats, such as catamarans or trimarans, by folding multiple boat shapes and connecting them together.

In summary, by varying the paper size, shape, and folding techniques, you can create an array of different boat shapes and sizes. Experiment with square and rectangular sheets of paper, and try advanced origami techniques to take your paper boat-making skills to the next level.

Ensuring Your Boat Floats

The Science of Floating

To ensure that your paper boat floats, it's essential to understand the basic science behind the floating phenomenon. When an object is placed in water, it displaces an amount of liquid equal to its own weight, in accordance with Archimedes' principle . If the displaced water weighs more than the object, the object will float as it experiences an upward buoyant force.

In the case of a paper boat, it is important to create a design that will displace enough water to counteract its weight. Key factors that affect the boat's ability to float include:

  • Surface area: A wider base increases the surface area in contact with the water, which helps increase water displacement and stability.
  • Weight distribution: Distributing the weight evenly across the base will help the boat remain stable and balanced.
  • V-shape: Origami paper boats usually have a V-shaped hull , which helps them cut through the water and maintain stability while moving.

Testing and Troubleshooting

Once you have crafted your paper boat, it's crucial to test and troubleshoot its ability to float. Some key steps include:

  • Make sure the boat's surface area is wide enough and the shape is correct, as shown in this tutorial .
  • Test your boat in calm water conditions, avoiding windy areas or strong currents that can tip the boat over.
  • If the boat is sinking, you may need to adjust the shape and make sure all folds are properly made.
  • If the boat is unstable, check the weight distribution and ensure that the sides are symmetrical.
  • To enhance your boat's stability and buoyancy, you can add waterproof material like tape or a layer of wax on the paper.

Testing and troubleshooting are essential steps in achieving a boat that floats and is stable in water. Once you are confident in your paper boat's ability to float, you can enjoy watching it sail across the water surface or even set up races with your friends.

Educational Resources and Activities

Incorporating Paper Boats into Lessons

Teaching the art of paper folding , also known as origami, is a wonderful way for teachers and parents to engage children in creative and educational activities. Paper boats are a perfect example of an easy-to-learn origami craft that can be incorporated into various subjects such as history, geography, and physics. One of the main advantages of this activity is that it only requires a single piece of paper - making it a cost-effective and easily accessible craft.

To incorporate paper boats into lessons, teachers can use Japanese origami as a starting point for discussing the history and cultural significance behind this art form. In geography, they can explore the role of boats and water travel in different countries. For physics, young learners can experiment with the buoyancy of their paper boats, demonstrating principles like Archimedes' principle.

Some useful resources for teaching origami paper folding include:

  • Online tutorials: Websites like wikiHow and YouTube channels offer step-by-step guides on how to fold a paper boat.
  • Books: Origami-themed books are available at local libraries or bookstores, which can provide inspiration for both children and adults.
  • Workshops: Some museums, cultural centers, and schools may offer workshops on origami paper folding, where children can learn from a knowledgeable instructor.

Craft Ideas for Parents and Teachers

When it comes to incorporating paper boats into kids' craft activities, the options are endless. Here are a few Summer-themed ideas to consider:

  • Nautical-themed parties: Use paper boats as decorations or centerpieces at a kids' summer party, encouraging the children to race their boats in a kiddie pool or a shallow water area.
  • Storytelling sessions: Incorporate paper boats into your storytelling sessions, using them as props to act out scenes from classic tales like "The Owl and the Pussycat" or "Paddle-to-the-Sea."
  • Art projects: Encourage your kids to decorate their paper boats with paint, glitter, or colored pencils, making each boat unique and personal.
  • Races and competitions: Organize paper boat races, offering small prizes or certificates of achievement to the fastest boats.

Remember, involving the children in the creative process helps to foster a sense of accomplishment and reinforces the educational benefits of these activities. So, whether you're a teacher, a parent, or simply a fan of Japanese origami craft, there are countless ways to enjoy and share the fun of making paper boats with the younger generation.

Frequently Asked Questions

What are the steps to create a floating paper boat?

To create a floating paper boat, first, fold a square piece of paper diagonally in half to form a triangle. Then, fold the bottom corners of the triangle towards the center, forming a diamond shape. Open up the bottom of the diamond and shape it into a square. Gently pull the top flaps apart to form the boat shape. For detailed steps, visit this tutorial .

Can you show how to make a paper boat with a sail?

Yes, to make a paper boat with a sail, start by following the steps for a basic paper boat. Then, create a small sail out of a rectangle of paper. Finally, attach the sail to the boat using a small piece of tape or glue. You can watch this video for a visual guide.

What is the ideal paper type for constructing origami boats?

The ideal paper type for constructing origami boats would be a lightweight yet sturdy paper, such as origami paper or regular printer paper. Keep in mind that heavy paper may not fold as easily, and thin paper may not hold its shape well. Visit this guide for tips on choosing the right paper.

How can I make a simple paper boat for children?

For children, start with a square piece of paper and follow the same steps mentioned above for creating a floating paper boat. Make sure an adult is present to supervise and help children with folding. Visit this tutorial for an easy-to-follow guide specifically designed for children.

Are there any specific designs that help paper boats float better?

Yes, specific designs can help paper boats float better, such as wider and more stable bases. Experimenting with different folding techniques and boat shapes can lead to more efficient designs. Refer to this step-by-step guide for more ideas on paper boat designs.

Could you provide a guide on making a paper boat using square paper?

Certainly. To make a paper boat using square paper, begin by folding the paper diagonally in half to form a triangle. Then, fold the bottom corners towards the center to create a diamond shape. Open the bottom of the diamond and re-shape it into a square. Gently pull the top flaps apart to form the boat shape. For a detailed guide, check out this tutorial .

paper sailboat ideas

Related Articles

Transom Boat: Essential Tips for Maintenance and Safety

Transom Boat: Essential Tips for Maintenance and Safety

Robalo Boats: Unrivaled Performance and Luxury on the Water

Robalo Boats: Unrivaled Performance and Luxury on the Water

Ocean 44 Yacht & Restaurant: Unparalleled Fusion of Luxury and Flavor

Ocean 44 Yacht & Restaurant: Unparalleled Fusion of Luxury and Flavor

Chris and Lisa Ruth: Ocean Littering Scandal Post Boca Bash 2024

Chris and Lisa Ruth: Ocean Littering Scandal Post Boca Bash 2024

Deck Boats 2024: Top Models and Innovations to Watch

Deck Boats 2024: Top Models and Innovations to Watch

Safe Harbor - Ultimate Marina Guide: Essential Tips and Insights

Safe Harbor - Ultimate Marina Guide: Essential Tips and Insights

Catamaran Boat: Insider Tips for a Smooth Sailing Experience

Catamaran Boat: Insider Tips for a Smooth Sailing Experience

Parts of a Boat: Essential Components Explained

Parts of a Boat: Essential Components Explained

How to Make a Paper Boat That Floats

license

Introduction: How to Make a Paper Boat That Floats

How to Make a Paper Boat That Floats

Making a paper boat can be challenging and fun. It can also be disappointing when you put your boat in the water and it quickly gets soaked and sinks. We have come up with an instruction set with 14 steps to make a more durable paper boat that will float better and last longer. And it only takes 7-12 minutes to make!

Step 1: Materials

  • One sheet of paper (8.5x11 inches).
  • Wax (Murray’s BEESWAX. It can be found in the hair aisle and purchased for ~$2).
  • Gloves, wax can stick to you (optional).
  • Newspaper, wax can stick everywhere (optional)!
  • Calm body of water.
  • Warning : Be careful not to get a paper cut!
  • Disclaimer: Does not sail well in rough waters. Will eventually sink.

Step 2: Set Your Midline by Folding in Half

Set Your Midline by Folding in Half

  • Take your sheet of paper and fold it long ways (hot dog style).
  • Unfold your paper to reveal the crease running down the middle of the page.

Step 3: Fold in Half (Hamburger Fold)

Fold in Half (Hamburger Fold)

  • Fold the sheet of paper in half from short side to short side (hamburger style). Don’t unfold it!

Step 4: Fold Corners in to Make a Triangle

Fold Corners in to Make a Triangle

  • Turn the folded paper so that the opening is facing you.
  • Fold down the top left and right corners until they meet at the middle crease to form a triangle shape.

There should be two flaps at the bottom of the paper that aren’t covered by the triangle.

Step 5: Fold Flaps to Make a Paper Hat

Fold Flaps to Make a Paper Hat

  • One at a time, fold the bottom flaps at the base of the triangle up over the triangle shape.
  • Each flap should be folded in opposite directions. The resulting structure should resemble a paper hat (above right).

Step 6: Folding the Corner Flaps

Folding the Corner Flaps

  • There should be four small corner flaps, two in front and two in back.
  • Fold each corner flap along the edge of the triangle so that no corner flap is sticking out.
  • The whole paper should form a triangle shape by the end of this step.

Step 7: Folding the Triangle to Make a Square

Folding the Triangle to Make a Square

  • Open up the bottom of the triangle.
  • Make the corners of the triangle meet. Hint: The corners with the folded flaps.
  • Squish the paper together to make a square and press down along the creases to keep the square shape.

Step 8: Fold Square Into a Triangle

Fold Square Into a Triangle

  • Two triangle-shaped flaps form the opening. Arrange the square like a diamond so that the opening is facing you.
  • Fold each flap so that the bottom corner of the diamond meets the top corner of the diamond. Flaps should be folded in opposite directions.
  • The paper should form an even smaller triangle!

Step 9: Fold the Triangle to Make a Square AGAIN!

Fold the Triangle to Make a Square AGAIN!

  • Similar to step 7, open the bottom opening of the triangle and make the corners meet.
  • Squish the paper together to make a square.
  • Press down along the creases so that the square keeps it shape.

Step 10: Boat Reveal!

Boat Reveal!

  • At this point, the square is divided in half by a diagonal opening.
  • One corner of the square can be pulled apart. Gently, pull this corner apart to widen the diagonal opening and reveal the boat!

Step 11: Flatten and Work Out the Kinks

Flatten and Work Out the Kinks

  • Press down on the bottom crease so that the paper looks like a flat trapezoid with just the tip of a triangle visible from the middle.

Step 12: Wax On!

Wax On!

  • Lay down newspaper and put on gloves (optional).
  • Using your fingers, spread a coat of wax onto the exterior surface of the boat. Wax from the bottom of the boat up to an inch above the bottom of the boat.
  • Apply wax liberally to both sides of the boat and edges.

Step 13: Add Wax on the Inside

Add Wax on the Inside

  • Once the outside has a coat of wax, open up the bottom of the boat and spread a coat of wax onto the interior surface of the boat. Wax from the bottom of the boat up to an inch above the bottom of the boat.
  • Apply liberally. Remember, the better you coat, the less leaks there will be!

Step 14: Make the Boat Stand

Make the Boat Stand

  • After waxing the boat, use your thumbs to widen the bottom gap of the boat.
  • Try to make the boat stand upright on a flat surface. If it stands straight on the table, it should stand straight in the water!
  • Hint: Try to make the triangle that juts out of the middle of the boat into a pyramid shape.

Step 15: Set Sail!

Set Sail!

  • Once the boat can stand, gently place your boat on a calm body of water.
  • Watch the boat float! Great for bathtubs, sinks, fountains, or, you know, whatever floats your boat!

Recommendations

Reusable Fabric "Mylar" Party Balloons

Puzzles and Games Contest

Puzzles and Games Contest

Make it Resilient

Make it Resilient

Outdoor Life Contest

Outdoor Life Contest

  • PRO Courses Guides New Tech Help Pro Expert Videos About wikiHow Pro Upgrade Sign In
  • EDIT Edit this Article
  • EXPLORE Tech Help Pro About Us Random Article Quizzes Request a New Article Community Dashboard This Or That Game Popular Categories Arts and Entertainment Artwork Books Movies Computers and Electronics Computers Phone Skills Technology Hacks Health Men's Health Mental Health Women's Health Relationships Dating Love Relationship Issues Hobbies and Crafts Crafts Drawing Games Education & Communication Communication Skills Personal Development Studying Personal Care and Style Fashion Hair Care Personal Hygiene Youth Personal Care School Stuff Dating All Categories Arts and Entertainment Finance and Business Home and Garden Relationship Quizzes Cars & Other Vehicles Food and Entertaining Personal Care and Style Sports and Fitness Computers and Electronics Health Pets and Animals Travel Education & Communication Hobbies and Crafts Philosophy and Religion Work World Family Life Holidays and Traditions Relationships Youth
  • Browse Articles
  • Learn Something New
  • Quizzes Hot
  • This Or That Game
  • Train Your Brain
  • Explore More
  • Support wikiHow
  • About wikiHow
  • Log in / Sign up
  • Hobbies and Crafts
  • Paper Craft

How to Make a Paper Boat with a Big Sail

Last Updated: November 3, 2022

wikiHow is a “wiki,” similar to Wikipedia, which means that many of our articles are co-written by multiple authors. To create this article, 13 people, some anonymous, worked to edit and improve it over time. This article has been viewed 62,318 times. Learn more...

You've heard of how to make a paper boat, right? Well, to make one with a bigger sail would be better, so read below to see how!

Step 1 Perfect your technique...

Community Q&A

Community Answer

  • If you are using scrap paper, when doing the first step in How to Make a Paper Boat (fold in half) then when doing so, the written/printed side must be face up and it will turn out better. Thanks Helpful 2 Not Helpful 1

paper sailboat ideas

Things You'll Need

  • 2 A4 sheets of paper (Any color)
  • A Glue Stick (Pritt or Bostik Recommended)

You Might Also Like

paper sailboat ideas

About This Article

  • Send fan mail to authors

Did this article help you?

Am I Smart Quiz

Featured Articles

Be a Fun Person to Hang out With

Trending Articles

Make Friends As an Introvert with Social Anxiety

Watch Articles

Clean Oysters

  • Terms of Use
  • Privacy Policy
  • Do Not Sell or Share My Info
  • Not Selling Info

wikiHow Tech Help Pro:

Level up your tech skills and stay ahead of the curve

  • Bridal Shower
  • Baby Shower
  • Valentine’s Day
  • Mother’s Day
  • Father’s Day
  • Fourth of July
  • Thanksgiving
  • New Year’s Eve
  • Food & Drink
  • Memory Keeping
  • From The Studio
  • Illustration
  • Celebration Expert Experience

Paper Boat Craft

paper sailboat ideas

A classic childhood craft the world over, a folded paper boat is a versatile craft that also makes great decor for a summer dinner or a Greek staycation (the paper boat is a popular symbol there). They’re also a lot of fun for kids to fold, decorate—and then play with! They can fold them with any color paper—or print out our stripe, star, and dot templates as shown here—or use white paper and color them in. Once your boat is ready you can:

– Write names on them and float or race them in a boat, pond, pool, sink or bathtub – Use them as place cards or table decor

paper sailboat ideas

– Make them cake toppers on a cake or cupcakes or even a bowl or cups of sea-blue jell-o – Fold a few and hang them as a mobile or string them as a garland – Write a note before folding and use them as a card for a birthday, Father’s Day, bon voyage, or any occasion

paper sailboat ideas

What you need:

  • Darcy Miller Designs Boat Pattern templates (stripe, star, and dot)
  • 8.5 X 11 white or colored paper
  • markers, crayons, or mini flags to decorate (optional)

Step 1: Download Boat Pattern Templates and print out. Step 2: You can work with a whole sheet of paper or cut it in half to make smaller boats. Step 3: Take your piece of paper and fold against a hard surface, following the nine steps in the diagram below:

paper sailboat ideas

Fold paper in half lengthwise, then unfold.

paper sailboat ideas

Fold paper in half widthwise.

paper sailboat ideas

Fold corners inward to center seam, creating an arrowhead shape.

paper sailboat ideas

Fold bottom flaps of paper up on each side, to overlap the triangle, as shown above.

paper sailboat ideas

Insert your thumbs into the bottom and pull out sides, pulling the paper into a diamond shape as shown above.

paper sailboat ideas

Put your fingers inside the bottom of the triangle and pull it open to form the diamond shape above.

paper sailboat ideas

Tada! You have your boat shape

Step 4: If desired, decorate your boat, coloring or painting the ship or taping a cocktail flag to the sail. Don’t forget to write a name across the bow!

Now find a pond, pool, sink, or bathtub, and you’re off to the races!

photo credits

A classic childhood craft the world over, a folded paper boat is a versatile craft that also makes great decor for a summer dinner or a Greek staycation (the paper boat is a popular symbol there). They’re also a lot of fun for kids to fold, decorate—and then play with! They can fold them with […]

Related Ideas

Darcy Miller Designs

Summer Bucket List

paper sailboat ideas

Olympic Medal Cookies

paper sailboat ideas

Olympic Doughnut Rings

paper sailboat ideas

Shaped Bird Feeders

  • Video Library
  • Monthly Collection
  • Craft Academy
  • Paper Flowers
  • Felt & Fiber
  • Kid's Crafts

DIY Paper Sailboat Centerpiece for Treats

paper sailboat ideas

  • Copy Link

Join our email list to learn about new projects, discounts, and membership perks!

paper sailboat ideas

Goodies You Can't Google

You've found a member-exclusive project. But for less than the price of a fancy coffee... You'll get instant access to this and over 2,000 other premium projects inside the Lia Griffith membership!

A picture of Vivian.

Set Sail With Snacks!

Need a nautical centerpiece for your next kid’s party? Never fear, the Lia Griffith sail crew is here! We’ve come up with an amazing, easy-breezy paper sailboat snack holder project. Anyone can make this DIY sailboat, giving you the perfect piece to weigh anchor in the middle of the kid’s table!

All you have to do is gather the materials and tools, then download the templates and instructions. Heave-ho on this impressive craft!

This content uses links from which we may earn a commission. Click  here  for more information.

  • Cutting Machine (recommended) 
  • Low-Temp Hot Glue Gun
  • Scissors  
  • Craft Knife  
  • Cutting Mat
  • Glue Dot Roller  
  • “Twilight” My Colors Heavyweight Cardstock
  • “Royal White” Recollections Linen  
  • Kraft Cardstock
  • “Patriot Blue” Smooth Solid
  • “Bluebell” Paper
  • 14-ply Chipboard
  • Kraft Packing Tape
  • White Twine
  • 12” Wooden Skewer

Instructions

  • Gather tools and materials.
  • Cut pieces according to the template. We cut the chipboard with the Cricut set to custom material – chipboard – more pressure, cut twice. You can also print out the template, trace onto chipboard, and cut with a craft knife.
  • Cut packing tape into smaller strips (if needed). Tape one of the sides to base of boat, following the curve. Make sure that the side is matched up with the bow (front) and stern (back) correctly (see template PDF).
  • Tape second side on. Match points of the bow together and tape edge.

Full tutorial available for members. Join here.

More Crafts Ashore!

We are here to help you explore your creativity with daily inspiration, downloadable cut files and printable templates that make  your  craft life easier. We believe in the power of creativity to nurture the soul and to empower us. Our designs are created with simplicity in mind and we always strive to provide you with the highest quality DIYs. Share what you’ve been up to with the LGM community by using  #MadeWithLia  — your creativity is our biggest inspiration!

Membership gains you access to our full library of DIY project tutorials complete with pattern downloads and instructions.  Head over to our membership page  to see a full list of benefits. And be sure to follow us on  Instagram ,  Facebook , and  YouTube . We look forward to making this the most creative year of your life! Happy crafting! ~ Lia and Team

Nautical Centerpiece

All the Goodies You Can't Google 🎁

Tired of scrolling endlessly for the perfect project? Save time, money, and Google-induced headaches with us! Our membership makes it easy to create beautifully finished crafts without needing to look all over the internet for ideas and materials or spend lots of money on individual videos and templates.

Already a member? Click here to log in.

Ask Lia or the community!

Leave a comment cancel reply.

Your email address will not be published. Required fields are marked *

Save my name and email in this browser for the next time I comment.

16 Comments

' src=

Hello, do I have to become a member in order to download the template? It has any cost? We are doing our vacations bible school and we will love to do the centerpiece.

' src=

You can become a monthly member for the templates. This allows you the monthly collection plus 5 extra projects for only the cost of $14.99. 🙂

' src=

After I download this I can’t go back and look at the tutorial? I hope I can

' src=

We suggest you download and save copies of all patterns, instructions and tutorials to your computer so you always have them to reference!

' src=

I do not see an SVG to cut with my machine. I only see to download and print and svg. How can I get the SVG for cutting electronically?

Yes there is an SVG available, it’s the first download titled “Large Paper Sailboat SVG”.

' src=

So beautiful!I like it!

' src=

Hi Can I separate the sails to cut separately? Thanks

Yes, they’re set up as different colors so they will automatically cut separately in Design Space.

' src=

Hi, Lia! I’m trying to download svg for the sailboat but it doesn’t let me. I’m using my iPhone. Can I do it on my iPhone or does it have to be a computer? Hopefully it doesn’t because my laptop is not working :((

Hi! As far as I know, you have to download our SVG files to a computer, then upload to Design Space. You may be able to find more info on Cricut’s site and perhaps there’s a workaround to use a smartphone or tablet!

' src=

C’est très joli ce vous faite es ce que je peux télécharger le modèle svp

' src=

Bonjour Lina, nous sommes ravis que le projet vous plaise! Nos modèles sont disponibles pour nos membres. Si vous envoyez un email à [email protected] , nous serons heureux de vous fournir plus d’informations sur nos options d’adhésion!

' src=

This is so neat, i love it. Just a great idea. Love your table setting also.

Thanks so much Yvonne!

Member Login

Email Address

Remember Me

Let your creativity bloom!

A crepe paper peony.

Join our email list to get a free flower crafting project bundle . Create four pretty peonies with the materials you already have on hand - in 60 minutes or less.

Your fresh picked peony projects are on the way to your inbox!

PROMO_ALT

Continue Download?

This will use up one of your extra projects for the month.

Save posts to your craft room with the Lia Griffith membership.

Enjoy your freebie.

Join our email list to instantly download this freebie and get more DIY inspiration delivered to your inbox.

  • Email Address *
  • Hidden download_url

Already a member? Log in to get this freebie.

paper sailboat ideas

  • Skip to primary navigation
  • Skip to main content
  • Skip to primary sidebar

Playtivities

go to homepage

  • Educational Activities
  • Toddler Art Activities
  • Toddler Motor Skills Activities
  • Preschooler Art Activities
  • Winter activities for kids
  • Cooking Activities for Kids
  • Traveling With Kids
  • Christmas Crafts
  • Motherhood Tips
  • Acts of Kindness Ideas
  • Kid Friendly Recipes
  • Things We Love
  • Easy Halloween Costume for Kids
  • About/Contact

Published: Aug 23, 2022 by Birute Efe · This post may contain affiliate links · 3 Comments

40 Boat Crafts Kids Will Love To Do (Many upcycled crafts)

Boat crafts collage for pinterest

There are few things kids enjoy doing more than playing in the water, and boats take the fun up a notch. Whether building a boat that floats for the backyard kiddie pool or making one out of paper, boats are a fun part of every kid's summer play.

boat crafts collage featuring two crafts

This summer, we have a great list of boat crafts for you to make with your children! These 40 boat crafts kids will love to do are simple and inexpensive, requiring only materials found around the house!

Kids will have a lot of fun building DIY boats and then seeing if they can keep them afloat on water.

Note: Add a little string to your boats so you can easily retrieve them without harming local wildlife, or avoid having sobbing children who want their boat back!

40 Fun Boat Craft Ideas For Kids

Make a boat from duct tape & sponges, origami paper boat, wax boat craft, pool noodle boats, shampoo bottle sailboat, diy cork sailboats, diy tug boat.

  • Let's Build a Pirate Ship

Milk Carton Boat Craft

Walnut boat craft, popsicle stick boat crafts, tin pan boat crafts, mayflower ship, diy basket boat, egg carton boat, cereal box boat, soda bottle boats, bottle lid boats, easter egg boats, twig bundle raft, viking longboat, soap bar boats, balloon boat, happy sailing, me hearties.

Time for our favorite Summer boat crafts your kids will love to create and play with! Children can design their boats, make them, and then watch how well they float!

Make A Boat from Duct Tape & Sponges

Kids are always looking for excuses to play in the water. These DIY sponge boats will keep your children entertained for hours. Kids will enjoy racing their boats and try tirelessly to sink them in the water. Making the boat is super easy! You will only need three things-- paper or duct tape for the sail, a kitchen sponge for the boat's base, and a skewer or a straw for the sail mast.

Cut the top two corners of the sponge. Push the skewer in the middle to make the sail mast. Make the sail from paper or duct tape. This boat is perfect for bathtime or outdoor play. Head over to The Craft Train to learn more about how to make these fun little sponge boats and many more summer crafts for kids!

Origami Paper Boat

Most paper boats are easy peasy and so much fun to make. You can create one with your toddlers during summer break and watch their eyes light up with joy! This boat craft only requires paper and paper folding skills!

Artsy Craftsy Mom has some great instructions on making paper origami boats and many other fun crafts for kids.

Wax Boat Craft

My kids love making wax boat craft . They are so much fun and easy to make! The best thing is they always float on water and never sink. You will need cheese wax, a toothpick, and paper to make the sails.

Sculpt your boat with the cheese wax. You can make little round boats. Stick the toothpick and make a sail out of paper. Your boat is ready to go on long adventurous voyages! Use your imagination and decorate your boat. This is a fun boat craft for younger and older kids.

Pool Noodle Boats

This is a great boat crafts for kids. You can create your Pool Noodle boats with simple supplies you can easily get at the dollar store. You will need pool noodles, colorful straws, and foam sheets. Follow the fun instructions on making pool noodle boats by Frogs and Snails and Puppy Dog Tails.

Using a knife, cut the pool noodle into small round shapes. Insert the straw on the side of the pool noodle and make the sails out of foam sheets. Your super cool pool noodle boat is ready to float.

Note: Parents can help their little ones by cutting the pool noodle with a knife.

Shampoo Bottle SailBoat

Bring out your creative spirit with these fun kids crafts. Make your own sailboat with a shampoo bottle. All you need is a bottle of shampoo, a straw, a stirrer, a piece of paper, elastic bands, and a wine cork or a piece of the pool noodle (to stick the stirrer in to use as a mast).

Make a hole in the wine cork, stick the stirrer in the middle, and use paper as a mast for the sailboat. Pink Stripey Socks has some great instructions on how to build a shampoo DIYtle sailboat , and you will also find other DIY boat ideas.

DIY Cork Sailboats

Cork sailboats are easy to make and float well on water. This kid-friendly craft is an ideal summer activity. These are the cutest and easiest boats you will ever make! You will find all the different materials you need around the house. You will need some corks, an elastic band, skewers, and paper.

Combine the corks with the elastic band and make a hole in the middle. Stick the skewer and make a pretty sail for your boat.

Go to Happy Hooligans to find out how to make a cork sailboat and other cool summer activities! Make as many as you want. Kids can share it with their best friend. These are great non toy gifts!

DIY Tug Boat

This boat craft is great for kids of all ages! Your kids will love building a boat that floats and moves. Make this simple self-propelled tug boat craft with materials around the house. You will need an empty butter box, popsicle sticks, a yoghurt container, and paint.

Place popsicle sticks around the sides of the butter box. Put the yoghurt container on top and tape it down. Paint your boat. Make a paddle out of a piece of plastic. Make slits in the paddle and inset the piece of plastic through them. Wind up your boat, and it's ready to float away!

DIY Canoe

Cardboard canoes are great entertainment for kids. Children can use the DIY canoes for a sailing role-playing game with friends and siblings. Kids can also load the canoes with their toys during pretend play and fly the canoe around the house.

Simply cut out a cardboard boat and use hot glue to stick the sides of the boat to the bottom piece and ends. Make oars of the boat out of toothpicks and paint your boat. You can add some extra decorations if you like. You can even put action figures inside the boat. Kids can race the boat around the house and have fun!

Let's Build a Pirate Ship

Let's Build a Pirate Ship

Ahoy, my maties! This is a fun-filled craft for all pirates fans. Sail away with this exciting pirate ship craft this summer. Kids will love making this exciting boat craft. You will need cardboard, masking tape, and a stick to make the ship's mast.

You can download a free pirate ship template from Red Ted Art here and start making your pirate ship today! Enjoy the day pretending to be pirates and explore the seven seas!

Milk Carton Boat Craft

This is a fun summer activity for kids of all ages. Kids can engage in imaginative play with this easy-to-make DIY milk carton boat craft . It's cheap to make, and you can easily find what you need at home. Have your child engage in some exciting science facts about buoyancy while they make the boat.

Cut one side of the milk carton and paint it. Use a skewer for the sail mast and a cloth or paper to make the sail. Kids can even use their toy as a pretend sailor while putting it in a pond or a bathtub to make it float.

Walnut Boat Craft

If you live near an area where walnuts grow, you're lucky! We have the perfect walnut boat craft for you. You can use this natural crafting material to create cute walnut boats with your friends. They are simple to make and will almost always float on water.

The fun thing is you can make two boats from one walnut! Divide a walnut into two and fill both with hot glue. Place a pipe cleaner in each to create a sail mast. Stick googly eyes to the sail and draw a smiley face with a marker. It's as simple as that! Your cute little walnut boat is ready!

Popsicle Stick Boat Crafts

Stay cool this summer with this fun popsicle stick boat craft. As a kid, I remember making these boats with rainbow-colored popsicle sticks. I now continue the same tradition with my children-- they really enjoy making popsicle stick boats.

Layer the popsicle sticks and glue them together. Stack popsicle sticks around the boat and use one as a sail mast. Throw your popsicle stick boats on a water table and have a boat race with all your friends!

Tin Pan Boat Crafts

Create a boat you will love floating in the river. This is a really easy boat craft that even toddlers can make without help from their parents. Don't worry about the mess kids will make. There won't be any!

Kids will only need a tin pan. I gave my kids one of my leftover baking tin pans, which was lying around the house. Kids will also need play dough and an ice cream stick for the sail mast.

Put glue inside the tin pan and stick a ball of playdough in it. Put your sail mast inside the play dough, and you are ready to take your tin pan boat out on a sailing trip!

Mayflower Ship

How about a history lesson while you make these fun boat crafts for kids? Make a Mayflower ship , an English ship that brought the first pilgrims to America. Make an exciting little ship from paper plates, wooden dowels, and other materials.

Cut the paper plate in half, join it together, and use wooden dowels as sail mast and paper to make the sail of your Mayflower ship . This is a fun craft to make, and you can hang it in your kid's room.

Note: Parents can help their kids with the scissors to cut the paper plates.

DIY Basket Boat

This DIY basket boat is a classic for kids! They can create their basket boat all on their own with their endless imagination. My kids usually take turns sitting inside the boat and giving a push to each other as they sail away on an unknown adventure! Better yet, if you have two or more laundry baskets, kids can have an exciting boat race!

All you need is a small laundry basket and a brown paper bag to make the sail mast. Use party streamers to decorate your boat. Kids love playing with this real-life boat. All the kids can take turns giving each other boat rides.

Egg Carton Boat

This is a great idea for kids o,f all ages. Egg carton boats are easy to make, and you will only need a few things you can easily find in the kitchen. Take an egg carton and cut it in half. Insert one or two straws to make the sail mast, and you are done. Paint and decorate your boat.

The fantastic thing is they float effortlessly on the water.

Cereal Box boat

Have a box of Cheerios lying around the house? We have a great boat craft idea and activities for kids that they can make from cereal boxes!

Cut out a rectangular shape from the cereal box and glue it together. Insert a skewer in the center and use newspaper to make the boat sail.

Kids will have a blast playing with their cereal box boats !

Soda Bottle Boats

Create your soda bottle boat and show it to all your friends. I'm sure they will love it and want one too! Simply cut the bottom part of the bottle, cover it in beautiful wrapping paper, and use a straw or skewer for the sail mast and paper to make the sail.

Kids can make more than one soda bottle boat and race them against each other.

Bottle Lid Boats

This is another great and simple summer crafts idea for kids. All you need is a bottle lid, playdough, and straw. Put some playdough into the lid and insert a straw. Use a colored sheet to make your sail.

Children will love making these cute little bottle lid boats .

This boat is a fun Easter activity for kids. Grab some plastic eggs, straws, play dough, and colored paper stock. Fill the eggs with play dough and insert the straw in the middle. Make a pretty sail out of bright-colored paper stock.

Kids can sail their easter egg boats on a pond or a tub of water.

Twig Bundle Raft

Return to nature with these super simple twig bundle raft boat activities for kids. Plan a fun family day at the local park collecting sticks to make your boat. Once the sticks are collected, cut them to the same size, hem them together, and tie them up.

Make your sail out of a leaf and float it on water.

Apple Boat craft

Kids can create their apple boats in seconds! It's super cool and easy to make. Just cut an apple in half, stick a skewer or ice cream stick into it and make a sail. Your apple boat is ready to float on water.

Note: Use clean water to float your apple boats so kids can have a delicious snack later!

Viking Longboat craft

Make a fun Viking dragon ship for kids to pretend play. To create your longboat, you will need rectangle and dragon-shaped cardboard cutouts. Glue them all together and make cardboard oars and seats. Decorate your Viking longboat and use it for role-playing with your friends.

Here's a cool idea, make dragon flames out of crepe paper and glue them to the dragon's mouth! Kids can also use their Viking toys as part of pretend play.

Soap Bar Boats

Soap bar boats are a great idea for a summer activity for kids. Children can make these easy boats by taking a soap bar, carving it into a boat shape, and inserting a small toothpick in the middle to make the sail mast.

Once your boat is ready, float it in a pond or pool. Head over to Teaching Mama to find out more about how to make awesome soap bar boats !

Balloon Boat

You can do much more with a balloon than just tying a string around it. To create your balloon boat, you will need a plastic container, balloon, straw, and rubber band. Punch a hole on one side of the plastic container, blow up your balloon and tie it to the straw. Insert the straw in the hole, and your boat is ready to float on water!

Read more about the balloon boat and how to make it on Life with Moore Babies.

Build boats and have fun with these boat craft activities for kids! Your child will have a great time creating and learning more about boats and how they float on water. Boat crafts are fun summer activities the whole family can enjoy!

paper sailboat ideas

Reader Interactions

Alyssa fowler says

August 25, 2022 at 4:33 am

Wowww i loved reading this the instructions were so simple. I tried many of these with my kids. Would live to read more posts like this one!!! It was fun and simple!!!! 🤗

Claudette says

October 09, 2023 at 1:20 pm

Great pictures and beautiful, fun projects to do. Thank you.

Csaba Nilgesz says

October 18, 2023 at 12:20 pm

Glad you like it Claudette!

Leave a Reply Cancel reply

Your email address will not be published. Required fields are marked *

Save my name, email, and website in this browser for the next time I comment.

Gala in the kitchen

5 Ways How To Make Easy Sailboat From Paper Napkin For Nautical Party

paper sailboat ideas

  • Share on Facebook
  • Share on Pinterest
  • Share on LinkedIn
  • Share by Mail

     Sailboats are a festive and classic nautical party addition. We can make sailboats from one color of napkins or in a combination of 2 colors, both will be cute and impressive. This is an inexpensive way to make decor for a Nautical-themed party. Use solid colored napkins to make boats and you can even use leftover napkins for other party themes . Check out these easy techniques on how to make boats out of paper napkins.

5 Nautical Sailboat Techniques:

  • Boat Napkin Fold.
  • Easiest Sailboat Paper Napkin Fold.
  • Ship Napkin Fold.
  • Sailboat Paper Napkin Fold (adds dimension to the table, the photo above)
  • Yacht Paper Napkin Folding.
For these paper napkin folds techniques, you need luncheons 13″ X 13″ paper napkins and cocktail paper napkins 10″ x 10″.

Photo Napkin folding in the shape fish

1. Boat Paper Napkin Folding Technique

paper sailboat ideas

       This technique I call a ship paper napkin fold. The reason it is larger from all boats on the page. In the photo above you see the ship on an 11″ diameter plate. It will be great on large plates or we can place it next to the plate with utensils on the table. The best nautical cutlery holder napkin fold. The ship napkin fold is great to place utensils in because large enough for any size of utensil, plastic, or silverware.

    This ship boat napkin folding with silverware inside works for any size of silverware as you can see in the photo, it fits very well. How I made 2 colors ship from a napkin, I explain at the bottom of the technique.

paper sailboat ideas

One 13″ X 13″ paper napkin

  • Fold the top of an unfolded napkin in two.

paper sailboat ideas

2. Fold the corner on the top of the napkin. Repeat the same on the other side and it will be the top of the ship.

paper sailboat ideas

3. Fold the bottom of the napkin.

paper sailboat ideas

4. Turn the napkin around. Fold the corners of the napkin.

paper sailboat ideas

5. Turn around and the ship is ready to decorate a nautical theme party table!

paper sailboat ideas

Ship Paper Napkin Fold Tip

The ship napkin fold will be interesting if we use 2 colors of napkins. I used white and blue napkins folded the same way. Place the white ship inside the blue ship and as a result, you see the ship with a white top and blue bottom napkin folding. Two colors ship more interesting visually, in my opinion.

paper sailboat ideas

2. Easiest Sailboat Paper Napkin Fold

paper sailboat ideas

     The sailboat paper napkin folding technique is the easiest technique on the page! I call it the origami sailboat technique because found the technique on one of the origami websites. We can use one napkin and it will be one color boat or we can use 2 colors napkins or make a sail in one color and the boat’s body (the bottom) another color. I used a 13″ X 13″ paper napkin but we can use beverage napkins as well to make this sailboat, the boat will be slightly smaller but looks better on the 9-inch paper plate.

paper sailboat ideas

Sailsboat Napkin Fold Steps:

  • Unfold napkin.

paper sailboat ideas

2. Fold the napkin in two diagonally.

paper sailboat ideas

3. Fold the napkin in two again as a book.

paper sailboat ideas

4. Fold the bottom of the napkin horizontally. Corner N2 is placed higher than corner N1 for more resembles a sailboat.

paper sailboat ideas

In the photo below larger sailboat is from a napkin size 13″ X 13″ and the smaller beverage napkin is 10″ X 10″.

paper sailboat ideas

3. Ship Paper Napkin Folding

paper sailboat ideas

       This boat paper napkin folding reminds me pirate ship with 2 sails, so I call this technique ship napkin fold. I used a 13″ X 13″ paper napkin to make this sailboat. The technique has a few more steps than others but the result is impressive and worth it!

Ship Napkin Fold Steps:

paper sailboat ideas

2. Fold the top and bottom as I show in the photo.

paper sailboat ideas

3. Bring together the left side and right side by holding the corners from the left and right sides. Then fold together point A+B and C+D

paper sailboat ideas

4. At this point we can choose, we leave the sails the same size both or slightly different. If you like the same size sails skip the next step.

paper sailboat ideas

5. One of the sails I fold in partially and now each sail has a different length.

paper sailboat ideas

6. Turn around and fold the bottom.

paper sailboat ideas

This is one of my favorite nautical napkin folding techniques. So Impressive!

paper sailboat ideas

4. Sailboat Paper Napkin Fold

      This is a super easy sailboat paper napkin fold. Just two simple steps and the sailboat is ready to decorate any Nautical party table. I like this sailboat napkin fold for simplicity. We need just 2 steps to make this sailboat from a paper napkin. It is 3 dimensions paper napkin fold and gives the table elevation and an impressive look. If you look for simplicity, check out this Nautical napkin folding technique from 13″ X 13″ napkin.

Sailboat Napkin Fold Steps:

  • Fold the napkin in two.

paper sailboat ideas

2. Roll the napkin as I show in the photo. We fold the napkin in four but without crease. It should have the shape of a cone.

paper sailboat ideas

3. Make a pleat by folding the bottom towards the top.

paper sailboat ideas

4. For a more realistic look the front is better made slightly taller than the back.

paper sailboat ideas

It will be great in any color of a napkin. The color depends on your theme. It can be colorful or just blue for the sailor party theme, boat theme, or other nautical theme party tables.

paper sailboat ideas

5. Yacht Paper Napkin Folding

paper sailboat ideas

       This boat paper napkin folding reminds me small yacht with 2 sails, so I call this technique yacht napkin fold. I used a 13″ X 13″ paper napkin to make this sailboat. One color or two colors easy design nautical napkin folding technique in just a few steps. 

Yacht Napkin Fold Steps:

  • Fold the napkin in two as I show in the photo.

paper sailboat ideas

2. Fold in two vertically.

paper sailboat ideas

3. Fold the top layer of the napkin in half.

paper sailboat ideas

3. Fold the bottom towards the top and our yacht is ready.

paper sailboat ideas

4. We can make two colored boats with this technique if we use 2 colors napkins. I fold the same way 2 color boats. Then I fold the yellow napkin’s corners behind and I have a triangle. I placed the triangle inside the blue napkin and have in two colors boat and on the bottom we can’t see the yellow napkin. Of course, we can make it easy and place one inside the other.

paper sailboat ideas

6. How To Make Easy Sailboat From 5 inch Square Paper Napkin

paper sailboat ideas

       This paper napkin folding in the shape of a sailboat is fun and so easy to make. I am using a beverage or cocktail paper napkin 5″ x 5″ to make the boat. We can make from the boat a name place card if we use a solid color napkin. We can make a sailboat napkin fold in 2 easy steps. Check out this easy technique!

  • Fold the napkin in half.

paper sailboat ideas

2. Fold the left top corner towards the bottom. Do the same with the left side.

paper sailboat ideas

3. Fold the bottom halfway toward the top of the triangle. The boat is ready to decorate the plate or table. It is a great nautical paper napkin folding technique for a party.

paper sailboat ideas

Cute and nice idea to decorate the plate with the boat from a napkin for a party or just to bring a smile to your guests!

Photo Boat From Paper Napkin

Experiment with different folding techniques, and colors of napkins. Make your unique sailboats.

Photo How to decorate paper plates with napkins Flower

Please Share!

⇓ check out my newer posts ⇓.

Purple Gift bag With tie

Easy Shirt With Tie Out Of Paper Gift Bag Idea

paper sailboat ideas

Heart Cloth Napkin Fold Idea For Romantic Dinner Or Valentine’s Day

Lotus napkin fold in wine glass

How To Make Lotus Linen Napkin Fold In Wine Glass

Photo Marshmallow cake decor Image

3 Easy Ways How To Make Flowers Out Of Marshmallows

paper sailboat ideas

How To Make Butterflies Cupcake Topper Out Of Mini Marshmallows

paper sailboat ideas

How To Make Heart Toast Without Cookie Cutter

Browse by ingredients :.

⇓ Search By ⇓

Logo Galainthekitchen.com on White

Leave a Reply

Leave a reply cancel reply.

Your email address will not be published. Required fields are marked *

Save my name, email, and website in this browser for the next time I comment.

Search By Tags

Follow me on facebook, subscribe to our mailing list.

Napkins in crystal napkin holder Photo

COMMENTS

  1. Step-by-Step Guide: How to Make a Paper Sailboat for Endless Fun

    Learn how to make a paper sailboat with this easy-to-follow guide and enjoy endless fun sailing it on any body of water.

  2. How to Make a Paper Boat: 10 Steps (with Pictures)

    Making an origami paper boat is a great activity that's easy to finish and doesn't require a lot of materials. The beauty of making a paper boat is that you only need one piece of printer paper to complete the task! By folding the paper with sharp creases and shaping it carefully, you can make a great-looking origami boat in minutes.

  3. Step-by-Step Guide: Make a Sailboat Out Of Paper Effortlessly

    Learn how to easily create a sailboat using just paper with this step-by-step guide. Perfect for a fun and creative DIY project!

  4. Paper Plate Sailboat

    Craft an easy mini sailboat using some basic materials - a paper plate, a craft stick, a toilet paper roll and some paper. Paint and decorate it into an awesome-looking sailboat. Make some paper people to ride in it too!

  5. How to Make a Cute Origami Sail Boat!

    Completed Origami Sail Boat This is a very simple traditional origami model, the origami sailboat makes a sweet little decoration perfect as decor at a kids party because they stand up, make great table place cards or, folded flat, use as a card embellishment.
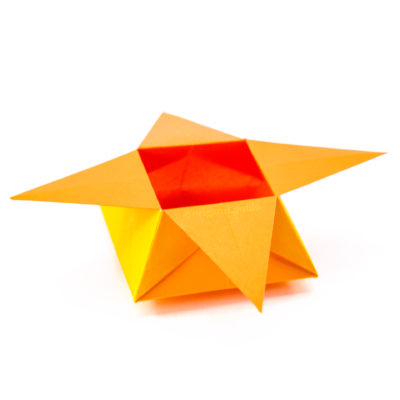
 You could also attach a long thread and use as a garland, hanging display or baby mobile. There are so many possibilities with this ...

  6. How to Make an Easy Origami Boat

    Make the most well-known origami boat at home. This paper boat can float in water and is a perfect project for kids.

  7. How to Make a Paper Boat

    Learning how to make a paper boat is SO FUN and really easy! With just five minutes and a sheet of regular printer paper, you can fold a cute little origami boat that actually floats on water. This is such a classic craft project that's quick and simple, and it's a really fun introduction to origami! Follow the step-by-step tutorial below, or watch the quick video to learn how to make a paper ...

  8. How to Make a Paper Sailboat Easy

    Watch this video to learn how to make a paper sailboat easy. To make this origami sailboat watch full video and follow the instructions step by step.

  9. How to make a paper boat (step-by-step instructions)

    Step-by-step tutorial to make an easy paper boat for kids. a. Take an A4 sheet paper. Hold it horizontally as shown in the picture. b. Fold it from left to right. c. Make a crease. d. Now, fold the paper from bottom to top.

  10. make a paper boat : a free tutorial

    I hope you make lots of paper boats! And for variety you can mess around with the sail configurations, scale and the edges of the boat template. If you make boats I'd love to see - please use #annwoodpattern on instagram or email a photo to me at info at ann wood handmade dot com.

  11. How to Make a Paper Boat: Easy Step-by-Step Guide

    In this article, you'll learn how to make a paper boat using a step-by-step tutorial. This guide will cover everything from selecting the appropriate materials to folding and decorating your paper boat, ensuring that it's both aesthetically pleasing and capable of floating. By carefully following the instructions provided, you'll be able to create a variety of boat shapes and sizes to suit ...

  12. How to Make a Paper Sailboat

    How to make paper sailing boat with color paper easily for beginners is shown in this paper crafts video tutorial for beginners. Its an easy origami sailboat...

  13. Sailboat Craft

    This summer sailboat craft is perfect to make as a beach or summer craft for kids! Using paper and craft sticks you can make your own paper sailboats and ocean scene. Kids will love making this!

  14. PDF PAPER SAILBOAT INSTRUCTIONS

    To make the sail, cut a trapezoid out of rice paper or other lightweight white paper. Make small slits at the top and bottom of the sail, and pull the skewer through.

  15. How to Make a Paper Boat That Floats

    Making a paper boat can be challenging and fun. It can also be disappointing when you put your boat in the water and it quickly gets soaked and sinks. We have come up with an instruction set with 14 steps to make a more durable paper boat that will float better and last longer. And it only takes 7-12 minutes to make!

  16. How to Make a Paper Boat with a Big Sail

    You've heard of how to make a paper boat, right? Well, to make one with a bigger sail would be better, so read below to see how! Perfect your technique for making a regular paper boat first.

  17. DIY PAPER WATERCRAFTS: PIRATE SHIP, SAILBOAT, SPEEDBOAT ...

    This video is a compilation of 05 different paper watercrafts including pirate ship, sailboat, speedboat, cruise ship (titanic ship) and mega yacht. These paper crafts are easy to make using both ...

  18. Paper Boat Craft

    Paper Boat Craft A classic childhood craft the world over, a folded paper boat is a versatile craft that also makes great decor for a summer dinner or a Greek staycation (the paper boat is a popular symbol there). They're also a lot of fun for kids to fold, decorate—and then play with! They can fold them with any color paper—or print out our stripe, star, and dot templates as shown here ...

  19. Ship Party Snacks with This DIY Paper Sailboat Centerpiece!

    Need a nautical centerpiece for your kid's party? We've come up with an amazing, easy-breezy paper sailboat snack holder project.

  20. 40 Boat Crafts Kids Will Love To

    Are you looking for some fun summer craft ideas? Try making these 25 fun and exciting boat crafts with your kids. From floating boats to pirate ships, Keep reading to find out more.

  21. 50+ Easy and Fun Preschool Boat Crafts and Activities

    Got a stack of paper lying around that you don't want to throw away because you might use it later? Then put them to use on this easy sailboat paper craft! Kids can build their own sailboat paper crafts by cutting strips of paper and making shapes for the boat.

  22. 5 Easy Ways How To Make Boat Out Of Paper Napkin

    This boat paper napkin folding reminds me small yacht with 2 sails, so I call this technique yacht napkin fold. I used a 13″ X 13″ paper napkin to make this sailboat.

  23. How to make a paper boat hat tutorial with free template

    Here is a paper boat hat tutorial with a template I made! I used a regular size sheet of paper and folded along these lines. Now that you know how to make a paper boat hat, here are a few more fun folding DIYs! Such as these adorable candle holders and these gift card holders! Top photo by Carly Taylor.