- PRO Courses Guides New Tech Help Pro Expert Videos About wikiHow Pro Upgrade Sign In
- EDIT Edit this Article
- EXPLORE Tech Help Pro About Us Random Article Quizzes Request a New Article Community Dashboard This Or That Game Popular Categories Arts and Entertainment Artwork Books Movies Computers and Electronics Computers Phone Skills Technology Hacks Health Men's Health Mental Health Women's Health Relationships Dating Love Relationship Issues Hobbies and Crafts Crafts Drawing Games Education & Communication Communication Skills Personal Development Studying Personal Care and Style Fashion Hair Care Personal Hygiene Youth Personal Care School Stuff Dating All Categories Arts and Entertainment Finance and Business Home and Garden Relationship Quizzes Cars & Other Vehicles Food and Entertaining Personal Care and Style Sports and Fitness Computers and Electronics Health Pets and Animals Travel Education & Communication Hobbies and Crafts Philosophy and Religion Work World Family Life Holidays and Traditions Relationships Youth
- Browse Articles
- Learn Something New
- Quizzes Hot
- This Or That Game New
- Train Your Brain
- Explore More
- Support wikiHow
- About wikiHow
- Log in / Sign up
- Hobbies and Crafts
- Paper Craft

How to Make a Paper Boat
Last Updated: November 10, 2023 Fact Checked
This article was co-authored by Robert Homayoon . Robert Homayoon is an Origami Expert known for his engaging YouTube videos and accessible instructions. He has been teaching origami on YouTube since 2009. His channel has a following of over 676,000 subscribers, and his videos have garnered over 211 million views. Robert uses his channel to highlight his passion for teaching people origami, crafts, and how to solve puzzles. He graduated from SUNY Albany in 2007 and earned his D.M.D degree from Temple University Dental School in 2013. There are 7 references cited in this article, which can be found at the bottom of the page. This article has been fact-checked, ensuring the accuracy of any cited facts and confirming the authority of its sources. This article has been viewed 4,462,742 times.
Making an origami paper boat is a great activity that’s easy to finish and doesn’t require a lot of materials. The beauty of making a paper boat is that you only need one piece of printer paper to complete the task! By folding the paper with sharp creases and shaping it carefully, you can make a great-looking origami boat in minutes. We'll walk you through folding your own paper boat with our complete step-by-step instructions.
Creating the Initial Folds

- To strengthen the crease, run your finger down the fold 3-4 more times.
- You should now have 2 creases along both centers (x-axis and y-axis) of the page.
- Use the crease you made before to help line up the folds coming in from the corners.
- The 2 folds should line up with each other.
Tip : When you go to fold the second side, use the first fold as a reference point.
- The flaps closest to you should be folded in front of the back flaps, not over them. If you fold over the back flaps, you won’t be able to fold the back flaps themselves.
Making the Final Folds
- Crease the paper along its edges so that it stays in the square shape.
- The bottom of the diamond should be the part of the paper with extra folds.
- The bottom corners will line up to become the bottom point of a square diamond.
- You may need to pull up the triangle inside the diamond while pulling apart the two sides. Try to keep the triangle inside the diamond sticking straight up as this will be your boat's "mast."
- You can reinforce the corners with clear tape and tape around the bottom to keep your boat dry.
Tip : Waterproof your boat! Use a waxed paper from an art store to make your boat last longer, or color one side of the paper completely with a crayon. You can also try to make your boat out of aluminum foil.
Expert Q&A

- If you are floating your boat on a large body of water, like a pond, you can tape string onto one end of the boat. Hold on to the other end of the string so that it doesn't float away! Thanks Helpful 311 Not Helpful 146
- Try to get the edges of the paper to line up. An evenly made boat means less chances of tipping over. Thanks Helpful 58 Not Helpful 32
- If you are making a tiny boat, don’t float it on a big body of water. You may lose it! Thanks Helpful 16 Not Helpful 11
Tips from our Readers
- If you don't have specialty supplies like wax paper or crayons, no need to fret. You likely already have the tools to waterproof your delicate paper boat right at home. Simply construct two separate boats out of ordinary printer or construction paper. Then, gently place one inside the other, nesting them together into a double-walled vessel. This should reinforce them to better withstand water without getting too soggy. Though, test float gently, as the extra weight could cause sinking if the little boat gets overburdened.
- Missing wax paper for true waterproofing? Simply equip your artist's toolkit by raiding the crayon bin! Thoroughly color one whole side of the boat with thick crayon before setting it afloat in a pool, pond or puddle. The waxy buildup should act as a shield against light water exposure. Though if embarking on choppier seas, extra reinforcements may still be needed, matey!
- Forego the plain printer paper and opt for fun vibrant colors and patterns! Tissue paper can make for a festively hued sail, but be extra delicate as it shreds easily, especially once wet. For best durability, stick to construction paper or card stock to give your boat more sturdiness as you launch it into the open water.

- Make sure you don't have any holes, as one little hole can turn into a huge rip. This could be good in a procedural text. Thanks Helpful 15 Not Helpful 3
You Might Also Like

Expert Interview

Thanks for reading our article! If you’d like to learn more about origami, check out our in-depth interview with Robert Homayoon .
- ↑ https://ussconstitutionmuseum.org/wp-content/uploads/2018/09/Make-a-Paper-Boat-Hard.pdf
- ↑ https://www.youtube.com/watch?v=b3QZpBL8-Tg#t=1m20s
- ↑ https://www.origamiway.com/origami-boat.shtml
- ↑ https://kids.nationalgeographic.com/nature/article/make-a-paper-boat
- ↑ https://www.origamiway.com/origami-boat-2.shtml
- ↑ https://www.youtube.com/watch?v=b3QZpBL8-Tg#t=2m54s
- ↑ https://kids.nationalgeographic.com/explore/nature/make-a-paper-boat/
About This Article

If you want to make a paper boat, fold a piece of paper in half from top to bottom. Then, fold it again from side to side and unfold so you have a crease in the center. Fold the top right corner down towards the center. Next, flip the paper over and fold the other corner down on the other side. Fold each of the bottom edges of the paper up and outwards to make a paper hat shape. Then, open the hat and flatten it horizontally to create a diamond. Fold the bottom edge of the diamond upwards towards the top. Then, turn the paper over and repeat on the other side. Pull the paper apart again and smooth it out to create a boat shape. Did this summary help you? Yes No
- Send fan mail to authors
Reader Success Stories
Emily Rehak
Jul 9, 2016
Did this article help you?
Ken Cunningham
Apr 4, 2016
Desmond Hodges
Jul 1, 2019
Georgiana Lings
Nov 9, 2016
Matthew Griffin
Mar 29, 2022

Featured Articles

Trending Articles

Watch Articles

- Terms of Use
- Privacy Policy
- Do Not Sell or Share My Info
- Not Selling Info
Don’t miss out! Sign up for
wikiHow’s newsletter

Boating Basics Online is reader-supported. When you buy via our links, we may earn a commission at no cost to you. Learn more
How to Build a Cardboard Boat in 7 Easy And Simple Steps
Written by J. Harvey / Fact checked by S. Numbers

Building your own boat can be a daunting task if done without instructions. Yet, with the right tools and process, DIY cardboard boat building can offer a great experience. It is also a popular group event where people may race the cardboard boats they build themselves.
If you are wondering how to build a cardboard boat, read this short article to get you started. We will cover some cardboard boat ideas for a simple cardboard boat, including building a cardboard boat step by step.
Keep reading to learn more.
Table of Contents
What You’ll Need
Step 1: prepare and inspect your materials., step 2: build a small scale model to test your design, step 3: measure and cut your cardboard into larger pieces, step 4: apply the smaller cuts and folds, step 5: build the boat structure, step 6: seal the boat, step 7: make the finishing touches, 1. use factory cut ends when putting pieces together, 2. prioritize folds over cuts, 3. practice cuts and folds, 4. make use of accurate measurements, 5. use a table.

For this guide, we will only use materials that adhere to standard cardboard boat regatta rules to use cardboard only.
- Cardboard pieces
- Razor or knife
- Measuring tape
- Glue applicator
- Manila folder
Preparation steps:
- Choose a boat design
There are many sources for choosing simple yet functional boat designs.
It is better to choose a flat hull design instead of a v-hull. Flat-bottom boats have always been more stable compared to v-shaped hulls, and this is especially true for calm waters.
- Determine the boat’s measurements
If you’re using a boat design, you probably won’t need to determine the boat’s dimensions yourself.
The first step is to count the number of passengers and account for their total weight. Consider a few things for the boat’s length; boats shorter than 10 feet are more difficult to steer, but the longer the boat, the harder it is to steer.
For the boat’s height, a number between 10 and 18 inches is a good range that allows enough arm room and clearance for paddling. Standard widths are 20 to 32 inches wide. After determining the dimensions of your boat, it’s time to check its buoyancy to make sure that it doesn’t sink.
- Calculate buoyancy
First, calculate the boat’s volume. Length x Width x Height in feet should give you the boat’s volume in cubic feet. Let’s use a boat sample that is 10 feet long, 24 inches wide, and 18 inches deep. Convert inches to feet.
10 x 2 x 1.5 = 30
With the figure 30 cubic feet, we will determine the positive buoyancy we want. This refers to the waterline and how much of the boat we want sticking out of the water. Having half of the boat out of water is 50 percent so multiply 30 cubic feet by 50%. The more weight on the boat, the more the boat submerges.
30 x 0.5 = 15
Now we take 15 and multiply it by 62.4, this is the weight of 1 cubic foot of water.
15 x 62.4 = 936
936 is the weight needed for half the boat to submerge in the water. Deduct the boat’s total weight, and you get the passenger weight capacity of your boat. If your boat weighs 50 lbs, then the boat’s weight capacity will be 886 lbs.
Steps to Build a Boat

This step-by-step instruction will be a generalized guide for building a DIY cardboard boat. Follow it in conjunction with a detailed boat design of your choosing.
Gather the materials you’ll need and make sure you have enough. It is important to refer to your design to ascertain that you have the proper number of cardboard sheets on hand for cardboard. Some boat designs use double layers of cardboard, so don’t forget to account for that.
It is very important to inspect your materials properly, especially cardboard. Ensure that your cardboard pieces are in good condition and have not been folded or stepped on. If you are using boxes for appliances or electronics, try to use pieces with as few folds as possible.
Before building your cardboard boat, it’s a good idea to make a small cardboard boat to test the design first.
Scale down the measurements of your boat and build a small boat using the same design with a manila folder. Set it on the water with a few rocks to simulate having passengers aboard.
After checking to see that it floats properly, begin building the full-sized boat.
Mark your cardboard pieces as necessary. Mark what to cut and what to fold to avoid confusion, and be sure to mark everything down right away. You can also use reference paper or a diagram sheet to trace over and cut the cardboard instead of marking it.
After making the necessary cuts, attach the bigger pieces together using tape, then reinforce them with other materials such as glue or what materials are allowed.
More complex cardboard boat designs would make use of smaller cuts and folds, usually for inserts that help reinforce the structure of the cardboard boat. Try to keep the number of small cardboard pieces to a minimum; make use of smaller folds and flaps instead. By keeping small pieces attached to a large cardboard piece, the entire structure of the cardboard boat will have better integrity overall.
Assemble the hull based on your chosen design. Use tape and glue to assemble the pieces but use clamps to hold them together during assembly.
You can use screws to hold pieces together; just make sure to remove them later and patch up the holes.
Some designs make use of a boat skeleton to support the entire boat. Still, in simple designs, pieces of cardboard placed horizontally across the boat serve as support for the boat structure and create compartments. These compartments divide the spaces and also help keep the boat afloat.
Some designs have more compartments to isolate leaks better. Don’t expect your boat to be leakproof, plan for the leaks instead. Finish with the bow and transom.
Now it’s time to seal gaps in the boat. This is where you’ll be using a lot of duct tape to seal any gaps or spaces. You can use sealant if allowed, but duct tape is usually the best option available.
Make sure to seal the edges of the cardboard since water will get into them regardless of whether or not these edges are submerged in water. Pay close attention to the bow, even if your boat design has one that is raised.
If your boat has a top layer, seal it and then attach it to the boat. If you don’t have a top layer, try to reinforce the seal of the top side and the bottom.
You can finish up by painting the boat but be careful with the paint and only use one part paint. Otherwise, your boat may not dry. The safer choice would be to use varnish though that limits the decorative aspect of your boat.
Finish by decorating your cardboard boat, but remember to consider the additional weight. If you need to make the paddles yourself, don’t forget to seal the edges for these.
Tips for Building Cardboard Boats

If you are using good-quality cardboard sheets for your boat, the cuts on those pieces of cardboard will probably be precise cuts. It helps keep track of which edges are factory cut ends when attaching cardboard pieces. The precise cuts will mean no gaps or spaces between the cardboard, contributing to the strength of the joined cardboard piece.
Having fewer pieces of cardboard will make the cardboard boat stronger and more durable. Minimize the number of cardboard pieces by using folds instead of cutting away pieces of cardboard whenever possible.
Before folding the cardboard, score one side using the blunt end of a knife or razor. Fold along the scoring with the scorched face inside.
Make use of scraps or smaller pieces of cardboard for practice to understand better how to cut and fold properly. Cuts need to be clean, while folds need to have the right pressure applied for both scoring and folding.
Try to be as accurate as you can with the cardboard measurements, and keep the cuts and folds as precise and clean as possible. Too many measurement errors will make it more challenging to assemble the boat and may even impact performance. While you don’t need to be an expert, make measurements with care.
The chances are high that this cardboard boat building activity will be done outdoors, but it’s a good idea to use a table, even a makeshift one. Everything from making accurate measurements to proper cuts will benefit from having a proper workspace.
You can make use of a sawhorse, a 2 x 4, and plywood to make a simple work table. There are other makeshift options as well. Whatever you choose, having a table will improve your work efficiency and help you better make a cardboard boat.
Now you have a better idea to build a cardboard boat step by step. While this is not a complete standalone guide, it should help you get a feel for what you need for a better cardboard boat construction.
If you know anyone else wondering how to build a cardboard boat, please share this with them as well. Don’t forget to leave your comments and suggestions below, as we’d love to hear from you.
Read more : Tips to build a plywood boat or your own pontoon boat .

“My intention from the first day establishing Boating Basics Online is to provide as much help as possible for boaters who want to experience a first safe and convenient trip. So feel free to join us and share your beautiful journeys to the sea!”

How to Make a Model Boat out of Cardboard

How to Set a Relic Watch
Toy boats are an easy craft to make in a single afternoon. Wooden boat designs can be modified to make the same craft with cardboard. Sailboats are more difficult to create than flatboats due to the need for balancing the weight of the sails so the boat doesn’t tip over. Cardboard is easy to decorate with markers and paint before sailing. Cardboard boats can be used repeatedly when carefully waterproofed.
Easy Cardboard Toy Boat
Cut out two cardboard rectangles 8 inches long and 4 ½ inches side. Lay the first cardboard rectangle on a flat surface with the short end facing you. Measure in 1 inch from the left edge and mark with a pen. Repeat with the right edge. Measure up 2 ½ inches from the bottom and mark with a pen. Use a ruler to draw a straight line between the marks to create a square measuring 2 ½ inches on each side. Cut out the square. There should be a one-inch flap on the right and another on the left side of the cardboard sheet.
On the same piece of cardboard measure 4 inches up from the bottom of the cardboard sheet along the left edge and mark the spot with an X with a pen. Set the compass for a 4½-inch radius. Place the point of the compass on the X at the edge of the cardboard. Draw an arc across the opposite side and toward the top of the cardboard with the pencil end of the compass. Repeat the process on the other edge of the cardboard to create two arcs that intersect near the top of the cardboard. Cut along the arcs to create the bow of the boat.
Place the first cardboard piece on top of the second and trace the boat shape onto the second piece of cardboard. Cut out the second piece of cardboard. Cut two strips of cardboard 8 inches long and 1 inch wide. Cut two small sqaures, each 1 inch long and 1 inch wide. Cut three cardboard strips 2 ½ inches long and 1 inch wide. Cut a cardboard strip 3 inches long and 1 inch wide. Use markers or paint to decorate the cardboard pieces before continuing.
Set one boat template on a flat surface with the bow facing away from you. Stand one of the 8-inch-long cardboard strips on top of the long edge of the boat and tape in place. Repeat with the other 8-inch strip of cardboard on the other long edge of the boat. Add tape around the bow to hold the two strips firmly together. Stand the 1-inch strips along the back of the flaps on the boat and tape in place. Apply the 2-½ inch strips around the square insert of the boat and tape in place. Apply tape at each corner to add strength. When all sides have been put in place add glue along the seam around the inside of the boat. Set aside to dry.
Set the second boat template on top of a piece of plastic wrap that is at least 10 inches long and 6 inches wide. Measure 1½ inches out from each edge of the template and mark with a pen. Cut the plastic wrap out along these marks to create a boat shape that is larger than the template. Wrap the plastic wrap up and around the cardboard bottom and sides of the boat, wrapping the edges into the inside of the boat. Cut a second piece of plastic wrap ½ inch larger than the boat template and wrap it around the other cardboard piece that will make the top of the boat. Glue plastic wrap in place as necessary. Set the 3-by-1-inch piece of cardboard on a sheet of aluminum foil. This piece will be the paddle. Cut a piece of aluminum foil large enough to cover the paddle twice. Cover the paddle with the aluminum foil and glue the edges of the foil shut to seal them.
Apply glue along the top of the walls of the boat and set the second cardboard boat template on top. Press in place. Allow the glue to dry completely. Stretch the rubber band across the back of the boat without twisting it. Insert the paddle between the flaps of the boat and between the rubber band edges. Turn the paddle to make the rubber band twist on either side of the paddle. Set the boat in the water and release the paddle. The rubber band will unwind, and the boat will move forward.
- The paddle should be light enough to float rather than sink when it has finished spinning.
Related Articles

How to Make a Scroll for a Preschool Class

How Did the Plains Indians Build Their Teepees?

Kids Christmas Craft Ideas Using Mason Jars

Greek Scientists That Invented the Catapult

How to Make Greek Musical Instruments

How to Refill a Parker Mechanical Pencil

How to Make a School Pep Rally Shirt

How to Make an Aztec Death Whistle
Based in Minneapolis, Dawn Marcotte has been writing for more than 10 years. Her recent writing has turned to nonfiction and includes articles on home and garden, education, crafts and automotive subjects. She currently has several eBooks published and available online. Marcotte has a Bachelor of Science in elementary education from the University of Iowa.

The Ultimate Guide: How to Make a Sailboat – A Step-by-Step Tutorial
Alex Morgan

Making a sailboat can be an exciting and rewarding project for those who love the thrill of the open water. Whether you’re an experienced sailor or a beginner, building your own sailboat allows you to customize the design and create a vessel that suits your needs. This guide will take you through the step-by-step process of making a sailboat, from gathering materials and tools to launching and testing the final product.
Introduction to Making a Sailboat
Building a sailboat is a complex and intricate endeavor that requires careful planning, attention to detail, and a love for craftsmanship. In this article, we will explore the various steps involved in making a sailboat, including gathering materials and tools, designing and planning the sailboat, constructing the hull, building and rigging the sail, adding finishing touches, and finally, launching and testing the sailboat.
Gathering Materials and Tools
Before diving into the construction process, it is essential to gather all the necessary materials and tools. We will discuss the essential materials required for building a sailboat, such as wood, fiberglass, epoxy resin, and fasteners. we will explore the various tools needed, including saws, drills, clamps, and measuring instruments. Having the right materials and tools is crucial for a successful sailboat-building project.
Designing and Planning the Sailboat
When it comes to designing a sailboat, there are several factors to consider. We will delve into these considerations, including the type of sailboat, its intended use, and the desired performance characteristics. We will discuss how to create a blueprint or design plan that outlines the specific dimensions, layout, and structural details of the sailboat.
Constructing the Hull
The hull is the foundation of any sailboat, providing buoyancy and stability on the water. We will explore the process of building the framework of the hull, including shaping and assembling the different components. we will discuss the techniques used for planking the hull, such as carvel planking or cold-molded construction.
Building and Rigging the Sail
The sail is a vital component of a sailboat, harnessing the power of the wind to propel the vessel forward. We will discuss the materials required for constructing the sail, including fabric, battens, and hardware. we will cover the steps involved in assembling and attaching the sail to the sailboat, ensuring proper rigging for optimal performance.
Finishing Touches and Final Steps
To add the finishing touch to your sailboat, there are several details to consider. We will explore how to add decorative elements and functional accessories to enhance the overall appearance and functionality of the vessel. we will discuss the steps involved in painting and varnishing the sailboat, protecting it from the elements and giving it a polished finish.
Launching and Testing the Sailboat
After months of hard work and dedication, it’s time to launch your sailboat and test its performance on the water. We will guide you through the necessary preparations before the first launch, including ensuring the boat is properly balanced and rigged. we will discuss the safety precautions to follow when testing the sailboat, ensuring a smooth and enjoyable sailing experience.
By following this comprehensive guide, you will gain the knowledge and confidence to embark on your sailboat-building journey. So, let’s set sail on this exciting adventure of creating your very own sailboat.
Key takeaway:
- Making a sailboat maximizes creativity: Building your own sailboat allows you to express your creativity and create a unique vessel tailored to your preferences.
- Gathering essential materials is crucial: To build a sailboat, you need materials such as wood, epoxy, fiberglass, and marine plywood, which are vital for constructing a sturdy and seaworthy vessel.
- Proper planning ensures a successful build: Designing and planning a sailboat involves considering factors like stability, weight distribution, and sail area to ensure the boat performs well in various conditions.
Gathering materials and tools is crucial when it comes to making a sailboat. Follow these steps:
1. Begin by researching the type and size of sailboat you wish to build. Gather information on the required materials and tools.
2. Create a comprehensive list of all the necessary materials including marine-grade plywood, fiberglass, epoxy resin, screws, and hardware.
3. Make a separate list of all the tools that you will need such as a circular saw, jigsaw, drill, sander, clamps, and measuring tape.
4. Take the time to find reliable suppliers for the materials. Compare prices and quality to find the best options available.
5. Once you have identified the suppliers , go ahead and place orders for all the materials you need. Make sure to order sufficient quantities.
6. If you don’t already have the required tools in your workshop, consider purchasing or borrowing them from someone reliable.
7. It is important to set up a dedicated workspace that provides enough room for you to work comfortably and store both materials and tools.
8. Ensure that your workspace is clean and well-organized. Pay special attention to proper lighting and ventilation.
9. As soon as you receive the materials , inspect them thoroughly for any signs of damage or defects. If you find any issues, contact the supplier immediately.
By following these steps, you will be able to successfully gather all the necessary materials and tools to begin building your sailboat.
What are the Essential Materials for Building a Sailboat?
What are the essential materials for building a sailboat? The necessary materials for constructing a sailboat include high-quality marine-grade plywood for the hull and deck. To reinforce the structure, fiberglass cloth and epoxy resin are employed. As for the assembly, stainless steel hardware is utilized, along with various types of sailcloth for the sails. The rigging is composed of stainless steel mast, boom, and rigging wires . To protect the wooden surfaces, marine-grade paint and varnish are applied. Joint sealing is achieved by utilizing adhesive, sealant, and caulking . Finishing touches are made with bungs, plugs, and filler materials . By using these materials in conjunction with the appropriate tools, one can build a sailboat that is robust and dependable for countless enjoyable hours on the water.
What Tools are Needed for Building a Sailboat?
To successfully build a sailboat, you will require a number of essential tools. Below is a comprehensive list of the necessary tools needed for the construction process:
1. Measuring tools: To accurately measure and mark the boat’s dimensions, you will need a tape measure , ruler , and protractor .
2. Saws: In order to cut materials, both a hand saw and a power saw, such as a jigsaw or circular saw , are indispensable.
3. Drill: A drill with various sizes of drill bits is crucial for creating holes in the boat’s structure and attaching components.
4. Screwdriver: To tighten screws and fasten hardware, you will need both flathead and Phillips head screwdrivers.
5. Clamps: Clamps are necessary to hold components together while they are being glued or screwed.
6. Sanding tools: To achieve smooth surfaces and eliminate imperfections, you will require sandpaper and sanding blocks .
7. Chisels: Chisels are essential for shaping and carving wood for intricate details or joints.
8. Planer: A planer is necessary to level surfaces and reduce the thickness of wooden components.
9. Painting tools: Brushes and rollers are indispensable for the application of paint or varnish, which serves to protect and enhance the sailboat’s appearance.
10. Safety equipment: Make sure to have safety goggles , gloves , and a dust mask to ensure your protection while working.
By utilizing these tools effectively, you will be able to successfully and safely complete your sailboat building project.
When designing and planning the sailboat, it is important to follow these steps:
1. Research different sailboat designs and hull types to gather information and ideas.
2. Determine the size and dimensions of your sailboat based on your needs and the resources available to you.
3. Create a detailed blueprint or design that includes important aspects such as hull shape, rigging, and deck layout.
4. Select materials for the construction of your sailboat based on factors like durability, weight, and cost.
5. Ensure the inclusion of safety features and necessary equipment, such as navigation instruments and life jackets.
6. Calculate the sail area and carefully choose the appropriate sails for optimal performance.
7. Evaluate the stability and balance of the sailboat to ensure safe sailing.
8. It is always helpful to consult experts for advice and guidance throughout the designing and planning process.
To guarantee success, it is crucial to consider your needs, seek expert opinions, and give utmost importance to thorough research, attention to detail, and careful planning.
What Factors to Consider when Designing a Sailboat?
When designing a sailboat, there are several factors to consider for a successful and efficient vessel. These factors include the intended use, hull design, sail plan, structural integrity, and ergonomics and comfort.
Firstly , the intended use of the sailboat must be determined. This involves deciding whether the sailboat will be used for racing, cruising, or both. The intended use will determine the size, shape, and necessary features for optimal performance.
Next , the hull design plays a crucial role in sailing performance. Factors such as stability, speed, and maneuverability should be considered when choosing a design.
The sail plan is another important aspect to take into account. The type and configuration of the sails will depend on the boat size, intended use, and sailing conditions. Factors like ease of handling, sail material, and the number and size of sails should be considered.
Structural integrity is essential for safety and longevity. It is important to consider the materials and construction techniques that can withstand water and wind forces.
Lastly , the sailboat should be designed with ergonomics and comfort in mind. This involves considering factors such as seating arrangements, control access, and storage space.
To ensure the best sailboat design, it is advisable to consult naval architects or experienced sailors for expert advice and guidance. Their knowledge and expertise will help in creating a well-designed and functional vessel.
When designing a sailboat, it is important to consider these factors to ensure a successful and efficient vessel that meets the specific needs of the owner.
How to Create a Blueprint or Design Plan?
When creating a sailboat blueprint or design plan, follow these steps on how to create a blueprint or design plan:
- Research sailboat designs based on sailing conditions and intended use.
- Measure and calculate sailboat dimensions, including length, width, and height.
- Create a detailed sketch, indicating parts like the hull, mast, keel, and rigging.
- Specify durable, lightweight, and cost-effective materials for each part.
- Develop a comprehensive list of materials and resources required, including quantities and specifications.
- Add precise measurements and dimensions to ensure accuracy and alignment.
- Annotate the blueprint with construction notes and instructions, including specific techniques.
To create an effective blueprint or design plan, consult experienced boat designers or naval architects for structural integrity and functionality. Utilize software or online tools for enhanced precision and efficiency. Careful planning and considering all aspects of the sailboat’s design will lead to a successful construction process.
To successfully construct a sailboat hull, it is important to follow these steps:
1. Begin by designing the hull, taking into consideration factors such as size, shape, and the materials that will be used.
2. Gather all the necessary materials for the construction process, including fiberglass, wood, or aluminum, depending on your preference.
3. Prepare the mold if fiberglass is the chosen material. Create a mold that matches the desired shape and apply a release agent to ensure easy removal.
4. Once the mold is prepared, start applying layers of fiberglass sheets and resin smoothly, making sure to avoid any air bubbles.
5. After the fiberglass has cured, carefully remove the hull from the mold and use sandpaper to smooth out any rough edges or imperfections.
6. To strengthen the hull, consider adding reinforcements such as bulkheads or ribs to provide structural support.
7. Install any necessary fittings according to the design, including cleats, ports, and drains.
8. For added protection and to enhance the appearance, apply a suitable coating or paint to the hull.
9. Prior to completing the construction process, it is important to thoroughly inspect the hull for any defects or leaks. Test the sailboat in water to ensure its proper performance.
To ensure a successful sailboat hull construction, it is crucial to plan properly, paying attention to detail, and following safety standards. If needed, consult professional boat builders or utilize resources that offer specific guidance tailored to your project. Happy sailboat construction!
How to Build the Framework of the Hull?
To learn how to build the framework of the hull, follow these step-by-step instructions. First, measure and mark your desired hull length on the building board. Next, cut long, straight pieces of lumber that match the hull length. Place these pieces parallel on the building board, making sure there is equal spacing. Secure the lumber to the building board using clamps or screws. Then, measure and mark the desired hull width on the lumber pieces. Cut shorter pieces of lumber that match the hull width. Attach these shorter pieces perpendicular to the longer ones, using screws or nails. Add any additional shorter pieces needed to complete the framework, ensuring even spacing. It’s important to check the framework for accuracy and make any necessary adjustments. Secure all connections with extra screws or nails for added stability.
Building the framework of the hull is a crucial step in sailboat construction. It provides the necessary structure and shape for stability and functionality in the water. By following proper measurements and securely fastening the lumber together, builders create a strong foundation for the rest of the sailboat. The framework acts as the backbone of the sailboat, allowing it to withstand wind and waves while providing structural support for other components. A sturdy framework ensures a well-built and seaworthy sailboat, enhancing the thrill of sailing.
What Techniques to Use for Planking the Hull?
To plank a sailboat’s hull , it is important to use the following techniques:
– First , prepare the planks by cutting them to the desired dimensions. Make sure they are smooth and free of defects.
– One effective technique is steam bending . Heat the planks in a steam box until they become pliable, and then shape them to fit the curvature of the hull.
– Next , fasten the planks securely to the hull’s framework using screws or nails. Ensure proper spacing and secure penetration.
– To prevent water from entering the hull through the seams, it is crucial to seal them. Apply a waterproof sealant like epoxy or polyurethane.
– After the sealant dries, sand the planks for improved appearance and performance.
Pro Tip: When planking the hull, take precise measurements and cut the planks carefully to achieve a tight fit. Properly securing and sealing the planks will result in a strong and watertight hull for your sailboat.
Building and rigging the sail is a crucial skill in sailing. Throughout history, civilizations like the Egyptians and Phoenicians utilized unconventional materials such as papyrus and animal hides to construct sails. In modern times, sailmaking has advanced using innovative techniques and high-quality materials. Today, the process of building and rigging sails involves precise measurements, intricate designs, and the utilization of high-performance materials. Sailmakers play a critical role in providing sailors with sails that are both durable and efficient, enabling them to harness the power of the wind and navigate through open waters.
To successfully build and rig a sail , follow these steps:
1. Choose the appropriate sail material: Begin by deciding on the type of material you wish to use for your sail, such as Dacron , nylon , or laminate .
2. Measure and cut the sail panels: Use a sharp fabric cutting tool to accurately measure and delineate the dimensions of the sail panels on the chosen material. Then, cut along the marked lines.
3. Assemble the panels: Arrange the sail panels in the desired order and position. Employ a sewing machine to securely stitch the panels together, ensuring that you follow the specified seam allowance.
4. Add reinforcements: Affix reinforcements, like corner patches and reefing points, to the relevant areas of the sail. These reinforcements enhance the sail’s strength and durability.
5. Install the sail hardware: Attach the necessary hardware, such as grommets, luff tape, and battens, to the sail. These components facilitate rigging and effective control of the sail.
6. Rig the sail to the mast and boom: Connect the sail to the sailboat’s mast and boom using suitable connectors, such as hanks or slides, securing the sail firmly in place.
7. Tune the sail: Adjust the sail’s tension by tightening or loosening the halyard and other control lines. This ensures optimal performance and shape during sailing.
What Materials are Required for Constructing the Sail?
To construct a sail for a sailboat, you will need several materials. First, you will need a durable and lightweight sailcloth made from materials such as Dacron or Nylon . This will provide strength and resistance to tearing. Next, you will need high-quality UV-resistant thread to sew the sail together, ensuring it can withstand the elements and maintain its integrity.
To strengthen areas of the sail that experience higher stress, such as corners and reef points, you will need adhesive-backed polyester tapes or webbing. These reinforcements will help keep the sail in good condition during use. You will need grommets or eyelets to create attachment points on the sail for halyards, sheets, and other lines. These can either be made of metal or plastic fittings.
It is important to insert battens into pockets on the sail to provide shape and stability. These thin and flexible strips can be made of fiberglass, carbon fiber, or wood, depending on your preferences. You will need hardware such as shackles, blocks, and cleats to attach and adjust the sail on the sailboat.
When constructing your sail, make sure to choose materials that are suitable for the size and type of sailboat you have, as well as the intended use of the sail. The materials should be durable, resistant to UV damage, and able to withstand the forces and conditions encountered while sailing.
How to Assemble and Attach the Sail to the Sailboat?
To learn how to assemble and attach the sail to the sailboat, follow these steps:
1. Prepare the sail and sail track: Lay out the sail, check for damage/debris, and ensure the sail track on the mast and boom is clear and in good condition.
2. Attach the halyard: Connect the halyard to the head of the sail and hoist it up the mast securely.
3. Attach the luff and tack: Slide the luff (front edge) of the sail into the sail track on the mast. Attach the tack (bottom front corner) of the sail to the fitting on the boat’s bow.
4. Attach the leech and clew: Slide the leech (back edge) of the sail into the sail track on the boom. Attach the clew (bottom back corner) of the sail to the fitting on the boom.
5. Tension the sail: Thoroughly tighten the halyard to remove any wrinkles or flapping in the sail. Ensure the sail is evenly tensioned along its edges.
6. Secure the sheets: Attach the sheets (lines that control the angle of the sail) to the clew and route them back to the cockpit, ensuring they are free from obstructions.
7. Test the sail: Adjust the sheets and the angle of the sail for optimal performance. Ensure the sail is properly trimmed and responding to the wind.
By following these steps, you can successfully assemble and attach the sail to your sailboat. Remember to always prioritize safety and seek guidance from experienced sailors if needed.
When applying the finishing touches to a sailboat, there are important final steps to consider:
1. Apply a final coat of paint or varnish to protect the wood and enhance appearance.
2. Securely install the rudder and tiller for smooth steering.
3. Tighten the attachment of the mast and rigging for optimal sailing performance.
4. Properly install the boom and attach the main sail .
5. Efficiently attach the jib sail to the forestay to capture the wind effectively.
6. Rig the halyards and sheets for easy sail control.
7. Securely mount any additional equipment.
8. Double-check all connections, fastenings, and fittings.
9. Thoroughly inspect the sailboat for any defects or issues.
10. Launch the sailboat and enjoy your completed creation.
How to Add Finishing Details to the Sailboat?
When it comes to adding finishing details to a sailboat, many people wonder how to do it correctly. Fortunately, I can guide you through the process step-by-step. By following these instructions, you will be able to achieve a polished final product that is both beautiful and functional.
Step 1: Sand
To start, you need to sand the entire surface of the sailboat. This will create a smooth texture and prepare it for the varnish or paint that you will be applying later.
Step 2: Clean
After sanding, it is important to clean the surface to remove any dust or debris. You can use a damp cloth for this task. Make sure the surface is completely clean and dry before proceeding.
Step 3: Prime
To protect the sailboat against water damage and create a smooth base, apply marine-grade primer. This step is crucial for the longevity of the finishing details. Allow the primer to dry completely before moving on to the next step.
Step 4: Varnish or Paint
Now comes the fun part – applying the varnish or paint. For a natural wood look, use multiple coats of marine-grade varnish. If you prefer some color and design, opt for marine-grade paint instead. Make sure to apply each coat evenly and allow enough time for drying between coats.
Step 5: Add Hardware
Once the varnish or paint has dried, it’s time to install any necessary hardware on the sailboat. This includes items such as cleats, handles, or hinges. Ensure that they are securely attached and in the correct positions.
Step 6: Detail
To enhance the aesthetic appeal of the sailboat, consider adding some decorative elements. Pinstripes, decals, or other decorative touches can really make a difference. Get creative with this step and add your personal touch to the sailboat.
Step 7: Inspect
Before you launch the sailboat, take the time to thoroughly inspect all the finishing details. Check for security and quality. If any adjustments or touch-ups are needed, make sure to address them before hitting the water.
By following these steps, you will be able to successfully add the finishing details to your sailboat. The end result will be a beautiful and functional watercraft that you can be proud of.
What Steps are Involved in Painting and Varnishing the Sailboat?
The steps involved in painting and varnishing a sailboat are:
- Clean the sailboat’s surface using a mild detergent and water to remove dirt and debris.
- Sand the surface with fine-grit sandpaper to create a smooth base for painting and varnishing.
- Apply a primer coat evenly to create a strong base.
- Let the primer coat dry completely as per instructions.
- Use a brush or roller to apply the desired paint color , starting from the top and working down.
- Allow the paint to dry between coats and apply more coats if needed.
- To varnish the sailboat, apply a thin and even coat in the direction of the wood grain.
- Let the varnish dry between coats and apply more coats for desired shine and protection.
Suggestions for painting and varnishing the sailboat:
- Use high-quality marine-grade paint and varnish for durability and protection against the elements.
- Consider using a marine-grade polyurethane varnish for a glossy finish.
- Take your time and ensure proper preparation and application techniques for a professional result .
- Follow safety precautions such as wearing gloves , goggles , and a mask to protect against fumes.
- Regularly inspect and maintain the painted and varnished surfaces for longevity.
When I launched and tested my newly built sailboat, I felt excitement and anticipation . Launching and testing a sailboat involves important steps to ensure functionality and safety. The calm waters were perfect for my maiden voyage. As I hoisted the sails and caught the wind, I tested the sailboat’s functionality by adjusting their angles to catch the wind. The sailboat glided effortlessly, showcasing the successful launch and testing process. The boat’s responsiveness and stability were remarkable, proving that launching and testing the sailboat properly resulted in optimal performance. I knew that my hard work had paid off. The sailboat performed flawlessly , and I felt proud as I navigated the open waters. It was an exhilarating experience , marking the successful launching and testing of my sailboat and the beginning of many memorable adventures.
How to Prepare the Sailboat for its First Launch?
To prepare the sailboat for its first launch, follow these steps:
- Check the hull: Inspect for damage or cracks. Ensure proper sealing and no leaks.
- Verify essential equipment: Have necessary safety equipment on board, including life jackets, flares, and a first aid kit.
- Secure the rigging: Check the mast, boom, and rigging lines for wear or damage. Tighten and secure them.
- Check the sails: Examine for tears or fraying. Ensure proper attachment to the mast and boom.
- Test the navigation equipment: Ensure proper functioning of the compass, GPS, and other navigational instruments.
- Inspect the engine: Check oil, fuel, and coolant levels. Start the engine to ensure smooth operation.
- Verify the bilge pump: Test to ensure it functions correctly and can remove accumulated water.
- Fuel and water: Ensure sufficient fuel and freshwater on board.
- Inform someone: Share sailing plans, including estimated time of departure and return, with someone onshore.
- Perform a safety briefing: Gather passengers and explain safety equipment location and emergency procedures.
Pro-tip: Before longer trips, it’s recommended to have a practice sail near shore. This will build confidence in handling the sailboat and verify proper functioning.
What Safety Precautions to Follow when Testing the Sailboat?
When testing a sailboat, it is important to follow safety precautions for a successful and safe experience. Here are some steps to consider:
1. Check the weather forecast: Before testing the sailboat, check the weather to avoid severe conditions like high winds or storms.
2. Inspect the sailboat: Thoroughly check the sailboat for any damages or issues with the hull, rigging, and sail.
3. Wear appropriate safety gear: Always wear a life jacket and suitable footwear.
4. Inform someone about your plans: Let someone know your plans, including location and duration, as a safety precaution.
5. Use proper navigation equipment: Have a compass and charts for safe navigation.
6. Start with calm waters: Choose calm and shallow water, especially if you are a beginner, and avoid strong currents or heavy boat traffic.
7. Be cautious of capsize risks: Understand the risk of capsize and practice self-rescue techniques.
8. Be aware of other boats and obstacles: Watch out for other boats, objects, or obstacles in the water to avoid accidents.
9. Follow boating regulations: Familiarize yourself with local regulations and follow them for a safe and legal experience.
10. Stay alert and maintain control: Always stay alert and in control of the boat, adjust to changing weather conditions.
Remember, safety should always be the top priority when testing a sailboat. By following these precautions, you can enjoy a safe and enjoyable sailing experience.
Some Facts About How To Make A Sailboat:
- ✅ Building a wood sailboat takes approximately 100 hours over a span of 3 months. (Source: www.instructables.com)
- ✅ The cost of building a wood sailboat is around $1,000, excluding tools. (Source: www.instructables.com)
- ✅ A wood sailboat requires materials such as oak plywood, brad nails, epoxy resin, etc. (Source: www.instructables.com)
- ✅ An origami paper boat can be made by folding a sheet of paper in a specific pattern. (Source: www.wikihow.com)
- ✅ Aluminum foil can be used instead of paper to make a waterproof origami boat. (Source: www.wikihow.com)
Frequently Asked Questions
1. how long does it take to build a wood sailboat.
Building a wood sailboat typically takes around 100 hours over a span of 3 months.
2. How much does it cost to build a wood sailboat?
The cost of building a wood sailboat is estimated to be around $1,000, excluding tools.
3. What materials are needed to build a wood sailboat?
To build a wood sailboat, you will need boat building plans, oak plywood, pencils, ruler, tape measure, brad nails, epoxy resin, epoxy hardener, silica thickener, wood flour thickener, masking tape, Japanese pull-saw, table saw, router, sanding discs, jigsaw, combination square, drill, wire or zip ties, C-clamps, mixing cups, mixing sticks, gloves, wax paper, fiberglass cloth, plastic spreader, waterproof glue, screws, fasteners, blocks, pad eyes, gudgeon & pintle, patience, and elbow grease.
4. How do you make a paper boat?
To make a paper boat, start by folding an 8 ½ in x 11 in sheet of paper in half. Follow the step-by-step instructions outlined in the reference to create the boat shape.
5. What materials are needed to make a paper boat?
To make a paper boat, you will need a sheet of printer paper or origami paper. Additional materials such as clear tape, waxed paper, or a crayon can be used to reinforce or waterproof the boat.
6. How do you increase the water resistance of a sailboat?
To increase the water resistance of a sailboat, you can use an outdoor craft sealant. Spray the entire boat with the sealant and let it dry before using.
About the author

Leave a Reply Cancel reply
Your email address will not be published. Required fields are marked *
Save my name, email, and website in this browser for the next time I comment.
Latest posts

The history of sailing – from ancient times to modern adventures
History of Sailing Sailing is a time-honored tradition that has evolved over millennia, from its humble beginnings as a means of transportation to a beloved modern-day recreational activity. The history of sailing is a fascinating journey that spans cultures and centuries, rich in innovation and adventure. In this article, we’ll explore the remarkable evolution of…

Sailing Solo: Adventures and Challenges of Single-Handed Sailing
Solo Sailing Sailing has always been a pursuit of freedom, adventure, and self-discovery. While sailing with a crew is a fantastic experience, there’s a unique allure to sailing solo – just you, the wind, and the open sea. Single-handed sailing, as it’s often called, is a journey of self-reliance, resilience, and the ultimate test of…

Sustainable Sailing: Eco-Friendly Practices on the boat
Eco Friendly Sailing Sailing is an exhilarating and timeless way to explore the beauty of the open water, but it’s important to remember that our oceans and environment need our protection. Sustainable sailing, which involves eco-friendly practices and mindful decision-making, allows sailors to enjoy their adventures while minimizing their impact on the environment. In this…
Your browser is out-of-date.
To get a better experience with our home designs, please download other browsers for free. Just click on the icon!

homify - modify your home
Browse through millions of photos with the homify app!
Quill And Fox
Best Design Studio

Amber Robertson
Amber Robertson is the founder of Quill and Fox. A creative writing studio that helps people find their voice and share their stories. Amber is also a published author, with her first book slated for release in 2020. She loves spending time with her family and friends, reading, writing, and traveling. When Amber was younger, she loved to write short stories and plays. But somewhere along the way, she lost touch with her creativity. It wasn’t until she became a mom that she realized how important it was to share her stories—both the good and the bad—with the people she loves most. That’s when Quill and Fox was born. Amber is passionate about helping others find their voice and share their stories. She believes that every person has a story worth telling, and it’s her mission to help them tell it in a way that is authentic and true to themselves

How to Make a Boat Out of Paper: A Beginner’s Guide
Table of Contents
Are you looking for a fun and easy craft activity that you can do at home? Making a boat out of paper is a classic activity that has been enjoyed by many generations. Not only is it a great way to spend an afternoon, but it also allows you to exercise your creativity and imagination.
In this beginner’s guide, we will teach you how to make a boat out of paper in a few simple steps. Whether you are a seasoned paper crafter or a complete beginner, this guide will help you create a beautiful paper boat that you can be proud of.
Materials Needed

Before we get started, let’s gather the materials you will need to make a paper boat. The good news is that you probably already have most of these items at home.
- A sheet of paper: You can use any type of paper, but we recommend using a square sheet of paper. You can use origami paper, printer paper, or even newspaper.
- Scissors: You will need a pair of scissors to cut the paper.
- Glue or tape: You will need glue or tape to hold the paper together.
- Optional: You can decorate your paper boat with markers, crayons, or stickers.
Basic Steps in Making a Paper Boat
Now that you have your materials ready let’s move on to the basic steps in making a paper boat. Follow these simple steps to create your paper boat:
- Start with a square sheet of paper. If you are using a rectangular sheet of paper, fold one corner over to the opposite edge to form a triangle. Cut off the excess paper to create a square.
- Fold the paper in half diagonally to form a triangle. Crease the fold and then unfold the paper.
- Fold the paper in half diagonally again, but in the opposite direction. Crease the fold and then unfold the paper.
- Fold the paper in half horizontally. Crease the fold and then unfold the paper.
- Fold the paper in half vertically. Crease the fold and then unfold the paper.
- Fold the corners of the paper towards the center crease. The paper should look like a kite.
- Fold the top layer of the bottom edge of the paper upwards to meet the center crease. Crease the fold.
- Repeat step 7 for the other side of the paper.
- Fold the top layer of the paper downwards along the horizontal crease. Crease the fold.
- Tuck the corners of the paper into the pockets that were created in step 8.
Congratulations, you have just made a paper boat! Now that you have mastered the basic steps, let’s move on to the different types of paper boats you can make.
Types of Paper Boats
There are many different types of paper boats that you can make, ranging from simple designs to more complex origami boats. Here are three types of paper boats that you can try:
- Classic Paper Boat: The classic paper boat is the design we just taught you how to make. This boat is easy to make and is perfect for beginners.
- Origami Paper Boat: The origami paper boat is a more complex design that involves more folding techniques. This boat is perfect for those who have some experience with paper folding.
- Paper Plate Boat: The paper plate boat is a fun and creative way to make a boat out of paper. You can use a paper plate as the base of the boat and decorate it with paper sails and flags.
As we mentioned earlier, there are various types of paper boats that you can make. Here are some of the most popular ones:
Classic Paper Boat
The classic paper boat is easy to make and perfect for beginners. It is a simple design that involves basic folding techniques. You can decorate it with markers, crayons, or stickers to make it more colorful and fun.
Origami Paper Boat
Origami paper boats are more complex than classic paper boats and require more folding techniques. This type of paper boat is perfect for those who have some experience with paper folding. There are many different types of origami paper boats that you can make, ranging from simple designs to more complex ones.
Paper Plate Boat
The paper plate boat is a fun and creative way to make a boat out of paper. You can use a paper plate as the base of the boat and decorate it with paper sails and flags. This type of paper boat is perfect for kids and can be used as a fun summer activity.
Tips and Tricks
Now that you know how to make a paper boat, here are some tips and tricks to help you create the perfect paper boat:
Choosing the Right Paper
When making a paper boat, it is important to choose the right type of paper. You can use any type of paper, but we recommend using a thicker paper, such as cardstock or construction paper. These types of paper are more durable and will make your boat last longer.
Making the Boat Waterproof
If you want your paper boat to float on water, you need to make it waterproof. You can do this by applying a layer of wax or clear nail polish to the paper. This will make the boat water-resistant and prevent it from getting soggy.
Adding Designs and Decorations
To make your paper boat more fun and colorful, you can add designs and decorations. You can use markers, crayons, or stickers to decorate your boat. You can also add paper sails and flags to make it look like a real boat. Let your imagination run wild and create a unique and beautiful paper boat.
Fun Activities with Paper Boats
Once you have made your paper boat, there are many fun activities you can do with it. Here are three fun activities that you can try:
- Racing Paper Boats: You can race your paper boat with your friends or family members. All you need is a tub of water, and you can race your boats to see whose boat is the fastest. You can also make adjustments to your boat to see which modifications help it move faster through the water.
- Floating Paper Boats in a Pool: If you have access to a swimming pool, you can float your paper boats on the water. You can also make a game out of it by trying to toss your boats into a designated area of the pool.
- Making a Paper Boat Fleet: Once you have made a few paper boats, you can create a paper boat fleet. You can decorate each boat differently or even create different types of boats to add variety to your fleet. You can display your fleet on a shelf or use it as a centerpiece for a party.
In conclusion, making a boat out of paper is a fun and easy craft activity that anyone can enjoy. With a few simple steps, you can create a beautiful paper boat that you can be proud of. There are also many fun activities that you can do with your paper boat, such as racing, floating, and creating a paper boat fleet.
We hope that this beginner’s guide has inspired you to try making a paper boat. Remember to have fun and let your imagination run wild. With a little creativity, you can create a paper boat that is truly unique and special. So grab your paper and scissors, and let’s get crafting!
How to Make an Easy Cardboard Boat

Introduction: How to Make an Easy Cardboard Boat

This is an Instructable about making a boat out of cardboard in a short amount of time. The materials are mostly objects that you have at home like cardboard, scissors, tape, etc. Before making this Instructable, I learned how to make a boat out of cardboard through the subjects design and science. I learned about the process of designing a boat(design specifications and also why we need to build the boats during flash floods) and some factors of boats(in science) that make them float like buoyancy(how an object floats), density(how much mass there is for a certain amount of volume), etc. After learning these topics, I was able to design/plan a boat that could most probably float. For example, I learned that a boat with greater volume helped the boat float better. This Instructable communicates my knowledge about Science and Design because I explain related topics of Science in the Instructable like the center of gravity, buoyancy, etc. I think these two subjects worked well together because with the two subjects we learn how a boat floats, and we also try to make a boat that floats. However, personally, I think another subject that could connect/contribute to this project is Math because it can help us with measuring objects precisely and also help us calculate things for the mass, volume, and more to make sure the boat floats(topics that design and science cannot cover.)

To make a cardboard boat you need the following materials:
- One 2m x 1.5m x 0.8m box(or any box that you have at home that you can go inside)
- plastic wrap/bubble wrap
- 18 two-liter pet bottles(or as many bottles needed to cover the bottom of your cardboard box)
- 1 roll of duct tape
- 1 pair of scissors
Step 1: Add the Pet Bottles

Flip the cardboard box over and add empty pet bottles or empty cartons to the bottom of the box. Use duct tape to stick the pet bottles to the box.
NOTE: You may need to use scissors for cutting the duct tape in the sizes that you want. If your box's dimensions are 2m x 1.5m x 0.8m, there should be 9 columns of pet bottles and 2 rows.
Step 2: Wrap the Boat With Bubble Wrap!

Wrap the bubble wrap around the boat as shown above. You may also use plastic wrap/cling wrap for this step. The wrap should cover the sides of the box and the pet bottles/cartons at the bottom of the box. Use duct tape to make sure the plastic wrap/bubble wrap does not fall off the boat easily. The finished product should look like the second picture in this step.
WARNING: Please be careful when handling bubble wrap/plastic wrap near small children and pets.
Step 3: Strengthen the Boat

Add duct tape inside the boat to make sure that no water would go inside it. Please check the pictures above for a more detailed description of where to put the duct tape. If needed, add more duct tape to the boat where there are holes, cracks, wobbly parts, etc.
After adding duct tape, add another layer of bubble wrap/plastic wrap to the cardboard box. Please use the image above as a reference.
Step 4: Important Notes

You are now done making the boat! The center of gravity should be somewhere around the dot that is in the drawing. On the bottom of the box, there should be two rows and nine columns of pet bottles(if your box's dimension is 2m x 1.5m x 0.8m.)
When you ride the boat, be aware of the center of gravity and don't go inside the boat in a rush. If you go inside the boat in a rush, there might be extra force added that pulls your boat downwards, which may cause your boat to sink.
Step 5: Making Oars

You might need to make oars to make it easier for you to move around during a flash flood. Here is a material list to make oars:
- 1 box(30cm x 30m if possible)
- 1 cutter or 1 pair of scissors
Step 6: Safety Measures

When using a cutter please make sure to keep children and pets away from you.
Step 7: Cutting the Cardboard

Use a cutter to cut out the flaps of the cardboard box. Then, separate the sides of the cardboard from each other. You should now have five separated sides of the cardboard box and the flaps. Please use the picture above as a reference.
Step 8: Making the Oar

Get one side of the cardboard box and fold it into thirds. Use duct tape to make it maintain its shape. Then, stick the folded side with duct tape to another side of the cardboard box that you cut out earlier. Make sure that the oar is stable enough. Add more duct tape if you think the oar needs more support.
Step 9: Wrap the Oars With Bubble Wrap

After making the base of the oar, wrap it with bubble wrap or with plastic wrap to make it waterproof. Use duct tape to stick the bubble wrap/plastic wrap to the oar. Repeat steps 5-9 until you have the number of oars that you want. If your boat is big it might be good to have at least four oars.
NOTE : When you are moving while using the boat hold the sides of the boat for support.
Recommendations

Green Future Student Design Challenge

Made with AI - Autodesk Design & Make - Student Contest

Fix It Contest


5 Ways How To Make Easy Sailboat From Paper Napkin For Nautical Party
- Share on Facebook
- Share on Twitter
- Share on Pinterest
- Share on LinkedIn
- Share by Mail
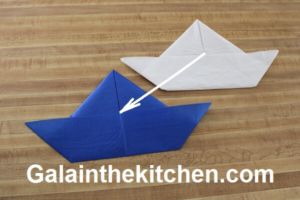
Sailboats are a festive and classic nautical party addition. We can make sailboats from one color of napkins or in a combination of 2 colors, both will be cute and impressive. This is an inexpensive way to make decor for a Nautical-themed party. Use solid colored napkins to make boats and you can even use leftover napkins for other party themes . Check out these easy techniques on how to make boats out of paper napkins.
5 Nautical Sailboat Techniques:
- Boat Napkin Fold.
- Easiest Sailboat Paper Napkin Fold.
- Ship Napkin Fold.
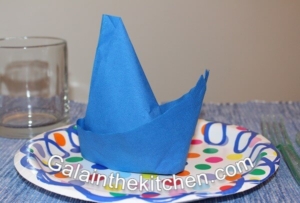
- Sailboat Paper Napkin Fold (adds dimension to the table, the photo above)
- Yacht Paper Napkin Folding.
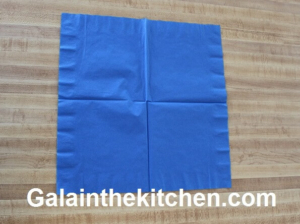
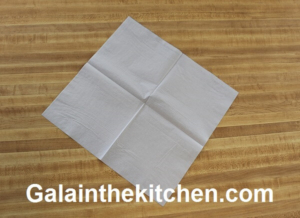
For these paper napkin folds techniques, you need luncheons 13″ X 13″ paper napkins and cocktail paper napkins 10″ x 10″.

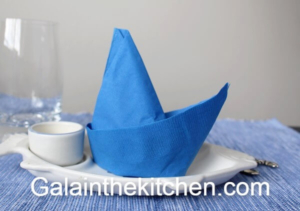
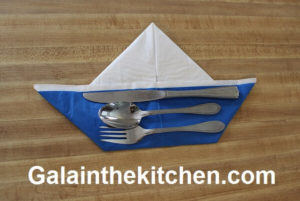
1. Boat Paper Napkin Folding Technique
This technique I call a ship paper napkin fold. The reason it is larger from all boats on the page. In the photo above you see the ship on an 11″ diameter plate. It will be great on large plates or we can place it next to the plate with utensils on the table. The best nautical cutlery holder napkin fold. The ship napkin fold is great to place utensils in because large enough for any size of utensil, plastic, or silverware.
This ship boat napkin folding with silverware inside works for any size of silverware as you can see in the photo, it fits very well. How I made 2 colors ship from a napkin, I explain at the bottom of the technique.
One 13″ X 13″ paper napkin
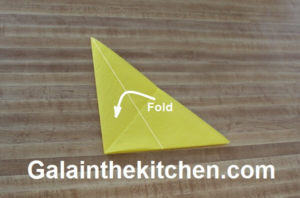
- Fold the top of an unfolded napkin in two.
2. Fold the corner on the top of the napkin. Repeat the same on the other side and it will be the top of the ship.
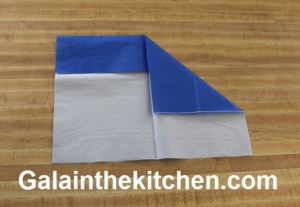
3. Fold the bottom of the napkin.
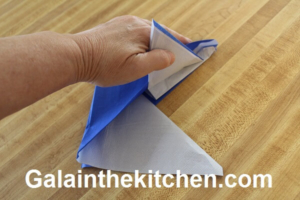
4. Turn the napkin around. Fold the corners of the napkin.
5. Turn around and the ship is ready to decorate a nautical theme party table!
Ship Paper Napkin Fold Tip
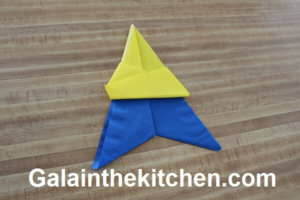
The ship napkin fold will be interesting if we use 2 colors of napkins. I used white and blue napkins folded the same way. Place the white ship inside the blue ship and as a result, you see the ship with a white top and blue bottom napkin folding. Two colors ship more interesting visually, in my opinion.
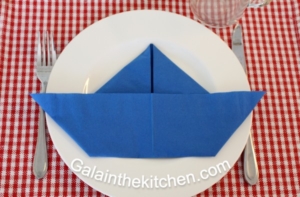
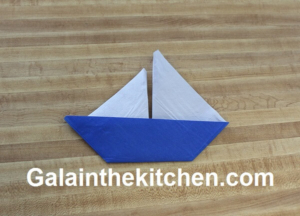
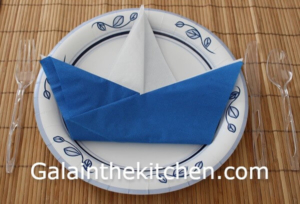
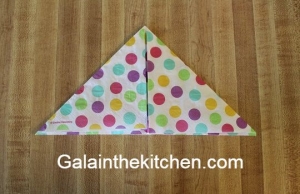
2. Easiest Sailboat Paper Napkin Fold
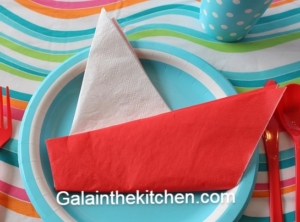
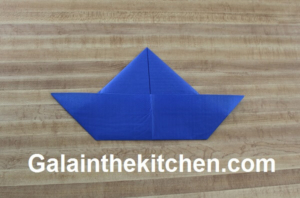
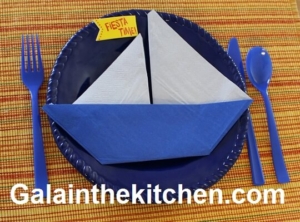
The sailboat paper napkin folding technique is the easiest technique on the page! I call it the origami sailboat technique because found the technique on one of the origami websites. We can use one napkin and it will be one color boat or we can use 2 colors napkins or make a sail in one color and the boat’s body (the bottom) another color. I used a 13″ X 13″ paper napkin but we can use beverage napkins as well to make this sailboat, the boat will be slightly smaller but looks better on the 9-inch paper plate.
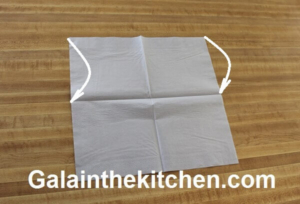
Sailsboat Napkin Fold Steps:
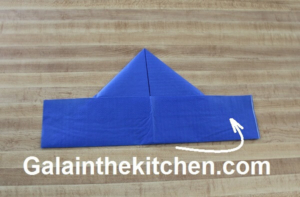
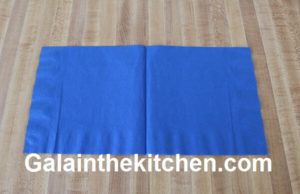
- Unfold napkin.
2. Fold the napkin in two diagonally.
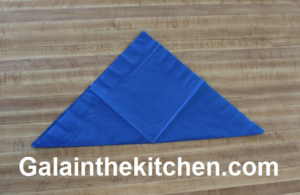
3. Fold the napkin in two again as a book.
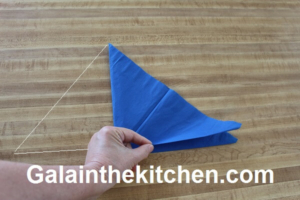
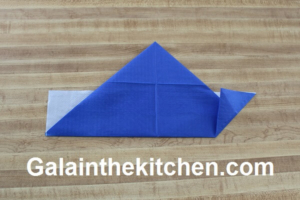
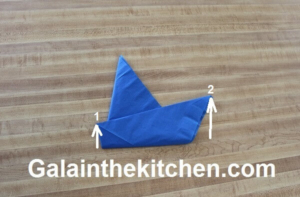
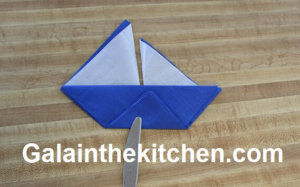
4. Fold the bottom of the napkin horizontally. Corner N2 is placed higher than corner N1 for more resembles a sailboat.
In the photo below larger sailboat is from a napkin size 13″ X 13″ and the smaller beverage napkin is 10″ X 10″.

3. Ship Paper Napkin Folding
This boat paper napkin folding reminds me pirate ship with 2 sails, so I call this technique ship napkin fold. I used a 13″ X 13″ paper napkin to make this sailboat. The technique has a few more steps than others but the result is impressive and worth it!
Ship Napkin Fold Steps:
2. Fold the top and bottom as I show in the photo.
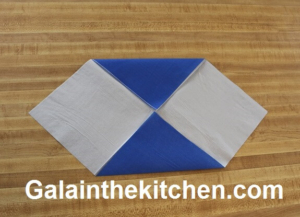
3. Bring together the left side and right side by holding the corners from the left and right sides. Then fold together point A+B and C+D
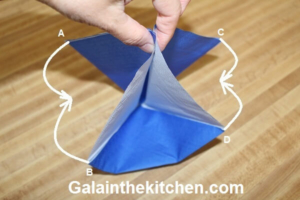
4. At this point we can choose, we leave the sails the same size both or slightly different. If you like the same size sails skip the next step.
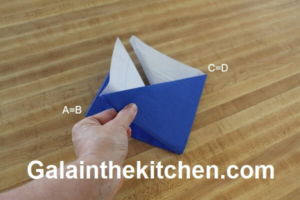
5. One of the sails I fold in partially and now each sail has a different length.
6. Turn around and fold the bottom.
This is one of my favorite nautical napkin folding techniques. So Impressive!
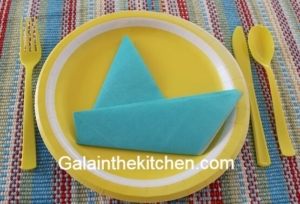
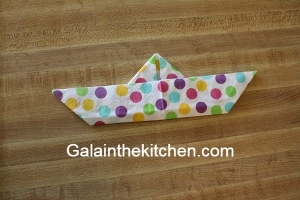
4. Sailboat Paper Napkin Fold
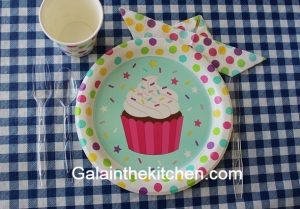
This is a super easy sailboat paper napkin fold. Just two simple steps and the sailboat is ready to decorate any Nautical party table. I like this sailboat napkin fold for simplicity. We need just 2 steps to make this sailboat from a paper napkin. It is 3 dimensions paper napkin fold and gives the table elevation and an impressive look. If you look for simplicity, check out this Nautical napkin folding technique from 13″ X 13″ napkin.
Sailboat Napkin Fold Steps:
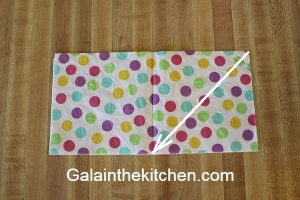
- Fold the napkin in two.
2. Roll the napkin as I show in the photo. We fold the napkin in four but without crease. It should have the shape of a cone.

3. Make a pleat by folding the bottom towards the top.

4. For a more realistic look the front is better made slightly taller than the back.

It will be great in any color of a napkin. The color depends on your theme. It can be colorful or just blue for the sailor party theme, boat theme, or other nautical theme party tables.
5. Yacht Paper Napkin Folding
This boat paper napkin folding reminds me small yacht with 2 sails, so I call this technique yacht napkin fold. I used a 13″ X 13″ paper napkin to make this sailboat. One color or two colors easy design nautical napkin folding technique in just a few steps.
Yacht Napkin Fold Steps:
- Fold the napkin in two as I show in the photo.
2. Fold in two vertically.
3. Fold the top layer of the napkin in half.
3. Fold the bottom towards the top and our yacht is ready.

4. We can make two colored boats with this technique if we use 2 colors napkins. I fold the same way 2 color boats. Then I fold the yellow napkin’s corners behind and I have a triangle. I placed the triangle inside the blue napkin and have in two colors boat and on the bottom we can’t see the yellow napkin. Of course, we can make it easy and place one inside the other.
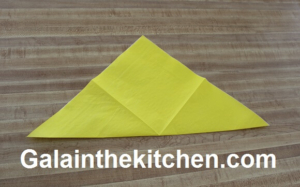
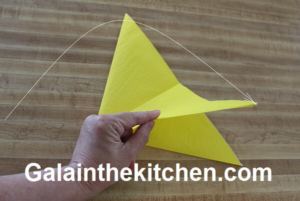
6. How To Make Easy Sailboat From 5 inch Square Paper Napkin
This paper napkin folding in the shape of a sailboat is fun and so easy to make. I am using a beverage or cocktail paper napkin 5″ x 5″ to make the boat. We can make from the boat a name place card if we use a solid color napkin. We can make a sailboat napkin fold in 2 easy steps. Check out this easy technique!
- Fold the napkin in half.
2. Fold the left top corner towards the bottom. Do the same with the left side.
3. Fold the bottom halfway toward the top of the triangle. The boat is ready to decorate the plate or table. It is a great nautical paper napkin folding technique for a party.
Cute and nice idea to decorate the plate with the boat from a napkin for a party or just to bring a smile to your guests!

Experiment with different folding techniques, and colors of napkins. Make your unique sailboats.
Please Share!
⇓ check out my newer posts ⇓.

How To Decorate And Cover Catering Plastic Trays Wrap For Reuse

Easy Christmas Napkin Folding Idea

2 Easy Heart Shaped Paper Napkin Folds For Romantic Dinner

How To Make Heart Toast Without Cookie Cutter

How To Make Pinwheel Toasted Bread Cups

Creative Way How To Serve Cold Brie Cheese On A Cheese Board
Browse by ingredients :.
⇓ Search By ⇓
Leave a Reply
Leave a reply cancel reply.
Your email address will not be published. Required fields are marked *
Save my name, email, and website in this browser for the next time I comment.
Search By Tags
Follow me on facebook, subscribe to our mailing list.

🏀 MARCH MADNESS
❗️ Men's first round set
🚨 (12) Vandy, (16) Presbyterian advance | Women's
Men's bracket
👀 Women's bracket
✍️ Create your bracket
Men's Brackets Lock In
Official Bracket
Ncaa.com | march 21, 2024, latest bracket, schedule and scores for 2024 ncaa men's tournament.

The 64-team NCAA tournament field is set! A thrilling slate of First Four action saw Wagner, Grambling State, Colorado and Colorado State emerge victorious, allowing for the first round of action to begin Thursday at 12:15 p.m.
Take a look at the complete, updated bracket below:
NCAA bracket 2024: Printable March Madness bracket
Click or tap here to open it as a .JPG | Click or tap here for the interactive bracket | PDF link

Here is the schedule for this year's tournament.
- Selection Sunday: Sunday, March 17
- First Four: March 19-20
- First round: March 21-22
- Second round: March 23-24
- Sweet 16: March 28-29
- Elite Eight: March 30-31
- Final Four: Saturday, April 6
- NCAA championship game: Monday, April 8
Here is the game-by-game schedule:
2024 NCAA tournament schedule, scores, highlights
Thursday, March 21 (Round of 64)
- (8) Mississippi State vs. (9) Michigan State | 12:15 p.m. | CBS
- (6) BYU vs. (11) Duquesne | 12:40 p.m. | truTV
- (3) Creighton vs. (14) Akron | 1:30 p.m. | TNT
- (2) Arizona vs. (15) Long Beach State | 2 p.m. | TBS
- (1) North Carolina vs. (16) Wagner | 2:45 p.m. | CBS
- (3) Illinois vs. (14) Morehead State | 3:10 p.m. | truTV
- (6) South Carolina vs. (11) Oregon | 4 p.m. | TNT
- (7) Dayton vs. (10) Nevada | 4:30 p.m. | TBS
- (7) Texas vs. (10) Colorado State | 6:50 p.m. | TNT
- (3) Kentucky vs. (14) Oakland | 7:10 p.m. | CBS
- (5) Gonzaga vs. (12) McNeese | 7:25 p.m. | TBS
- (2) Iowa State vs. (15) South Dakota State | 7:35 p.m. | truTV
- (2) Tennessee vs. (15) Saint Peter's | 9:20 p.m. | TNT
- (6) Texas Tech vs. (11) NC State | 9:40 p.m. | CBS
- (4) Kansas vs. (13) Samford | 9:55 p.m. | TBS
- (7) Washington State vs. (10) Drake | 10:05 p.m. | truTV
Friday, March 22 (Round of 64)
- (8) Florida Atlantic vs. (9) Northwestern | 12:15 p.m. | CBS
- (3) Baylor vs. (14) Colgate | 12:40 p.m. | truTV
- (5) San Diego State vs. (12) UAB | 1:45 p.m. | TNT
- (2) Marquette vs. (15) Western Kentucky | 2 p.m. | TBS
- (1) UConn vs. (16) Stetson | 2:45 p.m. | CBS
- (6) Clemson vs. (11) New Mexico | 3:10 p.m. | truTV
- (4) Auburn vs. (13) Yale | 4:15 p.m. | TNT
- (7) Florida vs. (10) Colorado | 4:30 p.m. | TBS
- (8) Nebraska vs. (9) Texas A&M | 6:50 p.m. | TNT
- (4) Duke vs. (13) Vermont | 7:10 p.m. | CBS
- (1) Purdue vs. (16) Grambling | 7:25 p.m. | TBS
- (4) Alabama vs. (13) College of Charleston | 7:35 pm. | truTV
- (1) Houston vs. (16) Longwood | 9:20 p.m. | TNT
- (5) Wisconsin vs. (12) James Madison | 9:40 p.m. | CBS
- (8) Utah State vs. (9) TCU | 9:55 p.m. | TBS
- (5) Saint Mary's vs. (12) Grand Canyon | 10:05 p.m. | truTV
Saturday, March 23 (Round of 32)
- TBD vs. TBD
Sunday, March 24 (Round of 32)
Thursday, March 28 (Sweet 16)
Friday, March 29 (Sweet 16)
Saturday, March 30 (Elite Eight)
Sunday, March 31 (Elite Eight)
Saturday, April 6 (Final Four)
Monday, April 8 (National championship game)
- TBD vs. TBD | 9:20 p.m.
Tuesday, March 19 (First Four in Dayton, Ohio)
- (16) Wagner 71 , (16) Howard 68
- (10) Colorado State 67 , (10) Virginia 42
Wednesday, March 20 (First Four in Dayton, Ohio)
- (16) Grambling 88 , (16) Montana State 81
- (10) Colorado 60 , (10) Boise State 53
Here's the complete seed list:
These are the sites for the men's tournament in 2024:
March Madness
- 🗓️ 2024 March Madness schedule, dates
- 👀 Everything to know about March Madness
- ❓ How the field of 68 is picked
- 📓 College basketball dictionary: 51 terms defined

Greatest buzzer beaters in March Madness history

Relive Laettner's historic performance against Kentucky

The deepest game-winning buzzer beaters in March Madness history

College basketball's NET rankings, explained

What March Madness looked like the year you were born
Di men's basketball news.
- Grambling State follows familiar footsteps as FDU, faces 1-seed Purdue in the first round
- Here is every HBCU that has won a men's NCAA tournament game in history
- Watch the Quest for the Perfect Bracket Tracker Live show — Day 4
- Watch the Quest for the Perfect Bracket Tracker Live show — Day 3
- 2024 NIT bracket: Schedule, TV channels for the men’s tournament
- Latest bracket, schedule and scores for 2024 NCAA men's tournament
- Blowout loss a footnote in Virginia's rocky tournament history
- With only 7 healthy players, Wagner is set to face 1-seed UNC
- Quest for the Perfect Bracket | Men's and women's bracket breakdowns
- In his 8th year of college basketball, Seth Towns gets another shot in March Madness
Follow NCAA March Madness
Advertisement
Supported by
What We Know About Trump’s Failure to Arrange a Half-Billion-Dollar Bond
Donald J. Trump’s lawyers told a judge that their client could not come up with the collateral needed to stave off efforts to collect a $454 million judgment. He has six days left.
- Share full article

By Kate Christobek and Ben Protess
It’s crunchtime for Donald J. Trump.
By Monday, March 25, the former president must secure an appeal bond for roughly half a billion dollars in his civil fraud case in New York, and his ability to do so was called into question this week.
In a court filing, Mr. Trump’s lawyers revealed that he had been unable to secure an appeal bond despite “diligent efforts” that included approaching about 30 bond companies.
While Mr. Trump this month managed to post a $91.6 million bond in his defamation case against the writer E. Jean Carroll, securing the deal at the 11th hour from a large insurance company , he lacks the assets needed to secure the far bigger guarantee for the fraud case.
If he cannot produce the bond in time, Mr. Trump faces the possibility of financial disaster and humiliation. New York’s attorney general, Letitia James, who brought the fraud case, would be entitled to collect the $454 million and could seek to seize Mr. Trump’s New York properties or freeze his bank accounts.
And Mr. Trump’s money problems spread well beyond New York. As the presumptive Republican nominee for president, he is facing increased pressure to raise money to fund his campaign, lagging behind his opponent, President Biden, in fund-raising.
In recent days, The New York Times has received many questions about Mr. Trump’s financial woes. Here are answers to several:
What was Trump accused of?
Ms. James took Mr. Trump, his company and his adult sons to trial last fall, accusing them of fraudulently inflating the value of his golf clubs, office buildings and other properties to the tune of about $2 billion.
Mr. Trump exaggerated the property values, and in turn his own net worth, to obtain favorable loan terms from banks and insurers, according to Ms. James.
At the trial, which lasted months, Ms. James’s lawyers showed that Mr. Trump’s company had ignored appraisals and manipulated numbers to sometimes absurd heights.
For example, the former president had valued his triplex apartment in Trump Tower on Fifth Avenue as if it were 30,000 square feet for years. It was actually 10,996 square feet.
Mr. Trump lost the trial. The judge overseeing the case — there was no jury — ruled in favor of Ms. James.
How was he punished?
The judge, Arthur F. Engoron, came down hard on Mr. Trump, imposing a judgment of $355 million plus interest, amounting to $454 million.
The judge also imposed a range of penalties that could curb Mr. Trump’s influence over his family business, barring him from serving as a top executive at a New York company for three years.
What comes next?
Mr. Trump has appealed the judgment.
Although he does not have to pay Ms. James’s office the $454 million while he appeals, he is on the hook to either cut a check to the New York State Court system for the full amount himself, or, more likely, obtain an appeal bond.
What is an appeal bond?
In this case, it would be a document in which a bond company promises to pay the $454 million judgment, plus interest, if Mr. Trump were to lose his appeal and fails to pay.
To obtain a bond of such size, Mr. Trump would need to pledge a significant amount of collateral to the bond company — about $557 million, his lawyers said — including as much cash as possible, as well as any stocks and bonds he could sell quickly.
He would also owe the bond company a fee that could amount to nearly $20 million.
Does he have enough cash to obtain one?
Short answer: No.
A recent New York Times analysis found that Mr. Trump had more than $350 million in cash as well as stocks and bonds, far short of the $557 million he would need to post in collateral.
In a court filing on Monday, Mr. Trump’s lawyers said they had contacted more than 30 bond companies, and none had agreed to do a deal.
But I thought he was a billionaire?
While Mr. Trump has long bragged about his wealth, his true financial position remains something of a mystery. And most of his wealth is tied up in his real estate holdings, which bond companies don’t typically accept as collateral.
He also has less liquid collateral available today than he did even a few weeks ago. Earlier this month, Mr. Trump had to post a $91.6 million bond in the defamation case he lost to E. Jean Carroll. For that, he most likely had to pledge more than $100 million in collateral to Chubb, the insurance company that provided the bond. That money cannot be used as collateral for a second bond.
What is the deadline for the bond?
Mr. Trump asked an appeals court either to pause the fraud judgment while he appeals it, or to accept a lesser bond of $100 million. The court could rule this week.
Although Ms. James could have moved to collect the $454 million immediately, she offered a 30-day grace period, which ends on March 25.
Ms. James could still grant additional time for Mr. Trump to pay or show mercy to the former president by offering a counterproposal.
What other options does Trump have?
If the appeals court denies his bid for a pause, and he still can’t find a bond by March 25, he might appeal to the state’s highest court.
Assuming that fails, he could quickly sell one of his properties or other assets, or seek help from a wealthy supporter. He might also try to obtain a loan from a bank, which he could then post as collateral for a bond.
And if all else fails, he could have the corporate entities implicated in the fraud case file for bankruptcy, which would automatically halt the judgment against those entities. But Mr. Trump is likely to balk at bankruptcy, and even if he were to pursue that path, it is not a panacea.
Ms. James’s judgment would not be halted against Mr. Trump himself, and she would most likely seek to hold him accountable for his company’s debts.
How could the state collect?
If Mr. Trump misses the March 25 deadline, Ms. James will be free to collect the money owed to the state.
It could get ugly for Mr. Trump.
Although Ms. James can’t put Mr. Trump in jail — because it is a civil case, not a criminal one — she still has plenty of leverage. With help from a local sheriff, she could freeze some of his bank accounts.
And if she wanted to take a more aggressive posture, she could even try to seize some of the properties involved in the case, including his office tower at 40 Wall Street in Lower Manhattan.
One swift option would be for her to place a lien on the buildings. Actually seizing them through the courts and the foreclosure process could take significant time.
Ms. James probably would not be entitled to seize assets unrelated to the case, though that and similar questions might require litigation to resolve.
Could Trump use campaign money to pay?
Probably not.
A super PAC supporting Mr. Trump’s candidacy can raise unlimited amounts of money, but it is legally banned from coordinating with him and cannot pay the judgment.
And although the former president has used a political action committee under his control to pay for lawyers and witnesses in his legal cases, that group lacks the kind of money needed to address the $454 million penalty.
He is now scrambling to raise campaign cash as he faces a significant financial deficit. Mr. Biden’s campaign recently announced that it had entered March with $155 million cash on hand. Mr. Trump’s campaign and the Republican National Committee had about $40 million total on hand at the end of January, though the Trump campaign has not released a more recent total.
What else is happening on March 25?
Mr. Trump also has a crucial hearing in his Manhattan criminal case, which could be the first prosecution of a former American president.
The Manhattan district attorney, Alvin Bragg, filed charges against Mr. Trump that accuse him of covering up a sex scandal involving a porn star to bolster his 2016 presidential campaign. The case is now proceeding to trial.
Jury selection was originally scheduled to start on March 25, but the trial was delayed late last week after the disclosure of more than 100,000 pages of records that had been in the possession of the federal prosecutors.
While the documents have now been turned over, Mr. Trump’s lawyers were given until mid-April to review the papers.
Justice Juan M. Merchan set the March 25 hearing to determine if the trial should be delayed further and to rule on Mr. Trump’s motion for an outright dismissal.
The Manhattan case is among four criminal prosecutions Mr. Trump faces.
Ben Protess is an investigative reporter at The Times, writing about public corruption. He has been covering the various criminal investigations into former President Trump and his allies. More about Ben Protess

Sports Betting
A beginner’s guide on how to fill out an NCAA Tournament bracket: The basics, tips and trends

It is estimated that in a given year, somewhere between 60 and 100 million people will fill out an NCAA men’s basketball tournament bracket, and it’s not just the hardcore fans doing it. March Madness is one of the most interactive sporting events in the country and doesn’t require a deep level of knowledge of the game — or really any knowledge — to get involved in the fun.
If you’ve never filled out an NCAA bracket before — or don’t have a lot of college basketball experience — and are looking to get involved this year, here are some important tips on how to get yourself started.
Important note to start out with: This is not geared toward college basketball fans or experienced bracket experts. It is for people new to the experience and looking to get their start. Yes, they do exist, and yes, they are welcome to join in the fun.
Advertisement
The NCAA men’s basketball tournament comprises 68 teams (32 automatic bids representing the conference champions and 36 at-large bids) and will involve 67 single-elimination games throughout the tournament, including the First-Four “play-in” games and then the remaining six rounds.
Your goal is simply to pick the winner of each game and ultimately end up with the championship team at the end.
The tournament is divided into four regional brackets, each consisting of 16 teams seeded No. 1 through No. 16. The highest seed plays the lowest seed in each round and follows a set bracket throughout the tournament.
The brackets do not re-seed after each round.
Your bracket will not be perfect and picking the eventual champion is not easy, even for experienced college basketball fans. So don’t get frustrated when your picks don’t pan always pan out.
The highest seeds generally win
Not only do the higher seeds win their individual matchups, they also tend to win the whole thing.
Since the tournament expanded to 64 teams in 1985, No. 1 seeds have won the overwhelming majority of championships. No. 1 seeds have accounted for 24 of the 38 championships since then (63 percent), while No. 2 seeds have won five and No. 3 seeds have won four.
That means 33 of the past 38 tournaments have been won a by a top-three seed. That is nearly 87 percent.
Only three tournaments since then have been won by a No. 5 seed or lower, and the lowest seed team to win it was a No. 8 seed ( Villanova in 1985).
You will still have upsets
While simply picking the highest seeds can produce some results for you, there will always be upsets in the tournament. Some are bigger than others.
The toughest upsets to get are in the No. 1 vs. 16 games (only twice in the history of the tournament) and the No. 2 vs 15 games (only 11 times), so you usually want to avoid picking those. The odds are stacked against you, and you might be throwing away a potential champion early on for no reason.
On average, there are eight upsets per year throughout the tournament where a lower-seeded team wins. There are rarely less than five. There are rarely more than 12. Keep that in mind when filling out a bracket. Ten upsets is usually a safe sweet spot to aim for.
There is also usually at least one No. 12 or No. 13 seed that advances every year, so it makes a lot of sense to mix in one of those in the No. 5 vs. 12 and No. 4 vs. 13 matchups.
While those teams tend to pull off early round upsets, they do not generally advance beyond the Sweet 16 or Elite 8.
Trust the big-name teams
Along with being dominated by higher seeds, you tend to see the same big-name programs cutting down the nets at the end of the tournament.
Since 1985, the 38 tournaments have been won by just 19 different teams. Twenty-three of the 39 tournaments have been won by just Connecticut, Duke , Kansas, Kentucky, North Carolina and Villanova.
With the exception of Villanova, all of those teams are among the best in the country again this season and will be among the top seeds in their respective brackets. It is reasonable to think one of them could add to their championship legacy this spring.
It might be boring to pick them. You might hate doing it. But it is not dumb.
(Photo credit: Andy Hancock / NCAA Photos via Getty Images)
Get all-access to exclusive stories.
Subscribe to The Athletic for in-depth coverage of your favorite players, teams, leagues and clubs. Try a week on us.
Adam Gretz is a freelance sports writer based in Pittsburgh, Pennsylvania. Along with the Athletic, he's written for CBS Sports, NBC Sports, Yardbarker, and SB Nation.
March Madness expert picks: Our bracket predictions for 2024 NCAA men's tournament
The experts have dissected the men's NCAA Tournament bracket , providing sleepers, Final Four matchups and upset predictions. Your chances of filling out a perfect bracket are miniscule , but maybe you need a few tips to win your office pool. We've got you covered with a look at how to pick an upset and a look historically at how the seeds have performed in the NCAA Tournament.
Still need help? Here's a closer look at each region: East , West , South , Midwest
Three of our five USA TODAY experts have UConn as their picks to win the national title on April 8. Here are our expert picks:
WOMEN'S PICKS: Our bracket predictions for 2024 NCAA women's tournament
Jordan Mendoza
Full bracket
IT'S BRACKET MADNESS: Enter USA TODAY's NCAA tournament bracket contest for a chance at $1 million prize.
- Final Four : UConn, Arizona, Houston, Creighton
- Final : UConn vs. Houston
- National champion : UConn
Paul Myerberg
- Final Four: Iowa State, North Carolina, Houston, Creighton
- Final: Iowa State vs. Houston
- National champion: Houston
Erick Smith
- Final Four: Iowa State, Baylor, Houston, Purdue
- Final : Iowa State vs. Purdue
- National champion: Iowa State
Eddie Timanus
- Final Four : UConn, North Carolina, Houston, Purdue
- Final: UConn vs. Purdue
- National champion: UConn
- Final Four: UConn, Saint Mary's, Houston, Creighton
- Final: UConn vs. Houston
IMAGES
VIDEO
COMMENTS
Multiply the total volume of your boat design by 62.4 (1000 if you're using metric measurements) to see if it'll support the total weight of your crew. Build your boat with corrugated cardboard to give it a sturdier frame. Finish off your boat with latex paint and varnish so it's ready to hit the water. Part 1.
To make a cardboard ship, start by cutting 3 same-sized rectangular strips of cardboard. Next, draw the curve of the boat's hull on 1 of the strips, arcing from 1 corner to the opposite side. Then, cut curves in both sides of the other 2 strips, which will be the sides of the boat.
For the full instructions visit: https://onelittleproject.com/how-to-make-a-paper-boat/These paper boats are SO FUN and they're so simple to make! All you ne...
1. Make the triangle into a square. Pick up the triangle, rotate it 45 degrees, then use your fingers to open up the bottom of the triangle. Pull the paper apart gently until it pops into a square shape. Make sure the bottom corners of the triangle fold over each other and become the bottom corner of a diamond.
Step 3: Create the Walls. Cut cardboard into the height of the walls you want. It is easier to keep the wall in a strip so you don't have to tape them together and risk more leaks. Line up the walls to the base. If you are going around a curve then mark it. Score the line and fold it so it goes around the curve.
To create the hull of the sailboat, follow these steps: Step 1: Take a rectangular piece of paper and place it in front of you. Step 2: Fold the paper in half lengthwise, creating a center crease. Step 3: Unfold the paper and fold the right and left edges towards the center crease.
Pictures of Cardboard Boat Designs. 1. DIY Cardboard Boat. This free cardboard fishing boat pattern would get you hooked. Once you are done with the construction of the model, you would have a gala time painting it red. Cardboard Boat. 2. Cool Cardboard Boat Design. This boat is made out of a cardboard box.
Steps to Build a Boat. Step 1: Prepare and inspect your materials. Step 2: Build a small scale model to test your design. Step 3: Measure and cut your cardboard into larger pieces. Step 4: Apply the smaller cuts and folds. Step 5: Build the boat structure. Step 6: Seal the boat.
Difficulty: ★ ☆ ☆ ☆ ☆ (Simple)In this video, you will learn how to make a paper boat. This is an easy traditional design that is perfect for beginners!This v...
Step 1. Cut out two cardboard rectangles 8 inches long and 4 ½ inches side. Lay the first cardboard rectangle on a flat surface with the short end facing you. Measure in 1 inch from the left edge and mark with a pen. Repeat with the right edge. Measure up 2 ½ inches from the bottom and mark with a pen.
Instead of cutting out paper nautical flags for, you can print our flags onto sticker paper and cut them out for little ones to decorate 2D sailboats with (or just pull them off and stick to their heart's desire!). 5. Make DIY nautical flag tangrams. Using large, colorful pieces of cardstock, cut out the shapes used in nautical flags.
Step 3: Making a Board #1. Supplies: Cardboard box. Duct tape. Measuring tape. Using the piece we made in step 2, we'll next make a board that belongs to the bottom part of the boat. By using the board, make a rectangle that is 1mx1.5m. Use a box cutter to arrange the shape, and use duct tape to connect it together.
How To Make A Boat Models With Cardboard #4 - Do It YourselfThis is a boat that made from cardboard. You can do it at home. How to make a boat models with c...
Fold the bottom edge of the triangle up towards the top point. Fold the bottom edge of the triangle up again, creating a small flap. Open the flaps on both sides to form the sail of the sailboat. Shape the hull of the sailboat using your fingers. Hold the sailboat gently by the hull and let it float in a bowl of water.
Please be positive and constructive. How to Build a Boat Out of Cardboard and Paper: This video shows how to make a single person boat using only cardboard, paper, glue, varnish, and paint.
Prepare the sail and sail track: Lay out the sail, check for damage/debris, and ensure the sail track on the mast and boom is clear and in good condition. 2. Attach the halyard: ... To make a paper boat, start by folding an 8 ½ in x 11 in sheet of paper in half. Follow the step-by-step instructions outlined in the reference to create the boat ...
Apply a double layer of hot glue when you stick the cardboard pieces. One way to ensure all the tiny gaps are closed is to apply glue on the top and the bottom of each edge, particularly for the bottom pieces that rest on the water. For instance, when you stick the bottom, sides, and back pieces of the boat, first apply glue along the inner ...
Crease the fold and then unfold the paper. Fold the paper in half vertically. Crease the fold and then unfold the paper. Fold the corners of the paper towards the center crease. The paper should look like a kite. Fold the top layer of the bottom edge of the paper upwards to meet the center crease. Crease the fold.
Step 2: Wrap the Boat With Bubble Wrap! Wrap the bubble wrap around the boat as shown above. You may also use plastic wrap/cling wrap for this step. The wrap should cover the sides of the box and the pet bottles/cartons at the bottom of the box. Use duct tape to make sure the plastic wrap/bubble wrap does not fall off the boat easily.
How to make cardboard boat easy or cardboard ship.An easy homemade boat tutorial for DIY cardboard boat is how to make boat with cardboard and you can try it...
5. Yacht Paper Napkin Folding. This boat paper napkin folding reminds me small yacht with 2 sails, so I call this technique yacht napkin fold. I used a 13″ X 13″ paper napkin to make this sailboat. One color or two colors easy design nautical napkin folding technique in just a few steps.
The Department will continue to assist our external partners through webinars, resources, and updates on the Knowledge Center.We also welcome our partners to continue to submit questions related to the 2024-25 FAFSA launch using the Contact Customer Support form in FSA's Partner Connect Help Center. To submit a question, please enter your name, email address, topic, and question.
Here's the official, printable NCAA bracket for the 2024 NCAA DI men's basketball tournament, also known as March Madness. The 68-team bracket was officially revealed on Sunday, March 17.
Donald J. Trump's lawyers told a judge that their client could not come up with the collateral needed to stave off efforts to collect a $454 million judgment. He has six days left.
In this video I will show you step by step how to make a paper boat.
On average, there are eight upsets per year throughout the tournament where a lower-seeded team wins. There are rarely less than five. There are rarely more than 12.
The experts have dissected the men's NCAA Tournament bracket, providing sleepers, Final Four matchups and upset predictions. Your chances of filling out a perfect bracket are miniscule, but maybe ...
I made a boat out of duck tape and cardboard. I sprayed the bottom of the boat with flex seal. Do you think it will FLOAT or SINK?Duct Tape: https://amzn.to/...